
Are you looking to enhance your website’s performance by adding custom DNS to your Namecheap account? You’re in the right place.
DNS, or Domain Name System, acts like the internet’s phonebook, translating domain names into IP addresses so browsers can load your website. By customizing your DNS, you can improve your site’s speed, security, and reliability. Imagine having more control over your website’s destiny, ensuring that every visitor experiences seamless browsing.
In this guide, you’ll learn exactly how to add custom DNS to Namecheap, empowering you to take your website management to the next level. Keep reading, and unlock the secrets to a smoother, faster, and more secure online presence.
Credit: kinsta.com
Accessing Your Namecheap Account
Accessing your Namecheap account is the first step to manage your DNS settings. It’s essential for adding custom DNS records efficiently. This process is straightforward, even for beginners. You’ll need your login credentials handy.
Logging Into Your Namecheap Account
Visit the Namecheap homepage. Click on the “Sign In” button. It’s usually at the top right corner. Enter your username and password. If you don’t have an account, you’ll need to create one.
Navigating The Dashboard
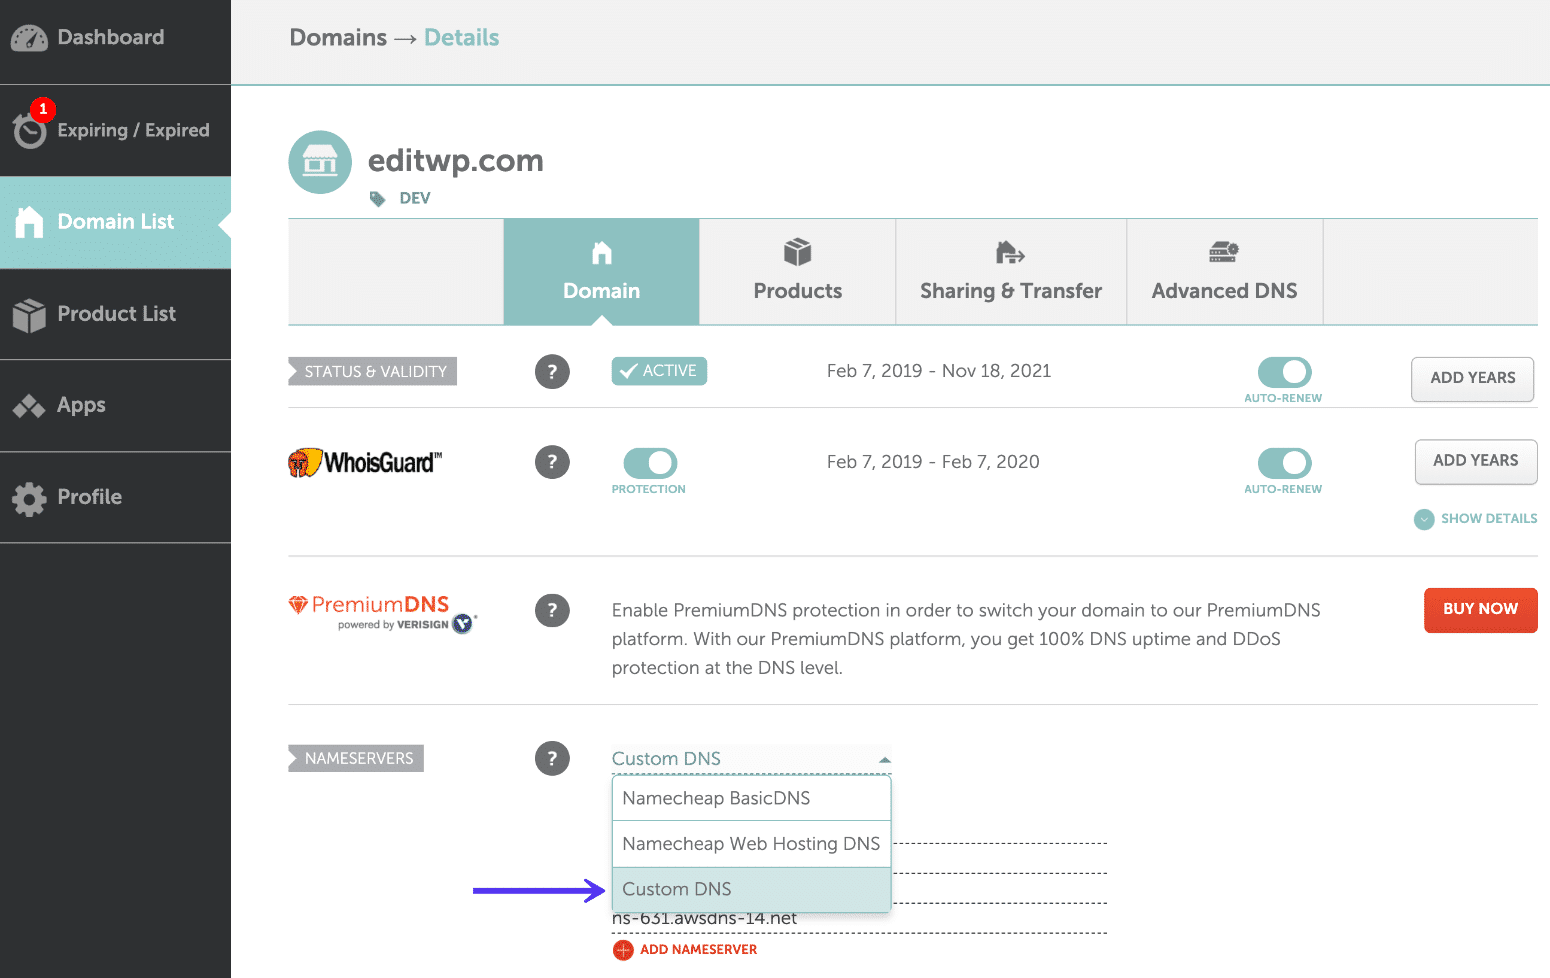
Once logged in, you’ll see your dashboard. It’s your control center. Here, you can access all your domain settings. Look for the “Domains” section. It displays a list of your registered domains.
Selecting The Domain To Modify
Identify the domain you want to update. Click on it to open the domain details page. This is where you’ll make changes to DNS settings.
Finding The Dns Settings
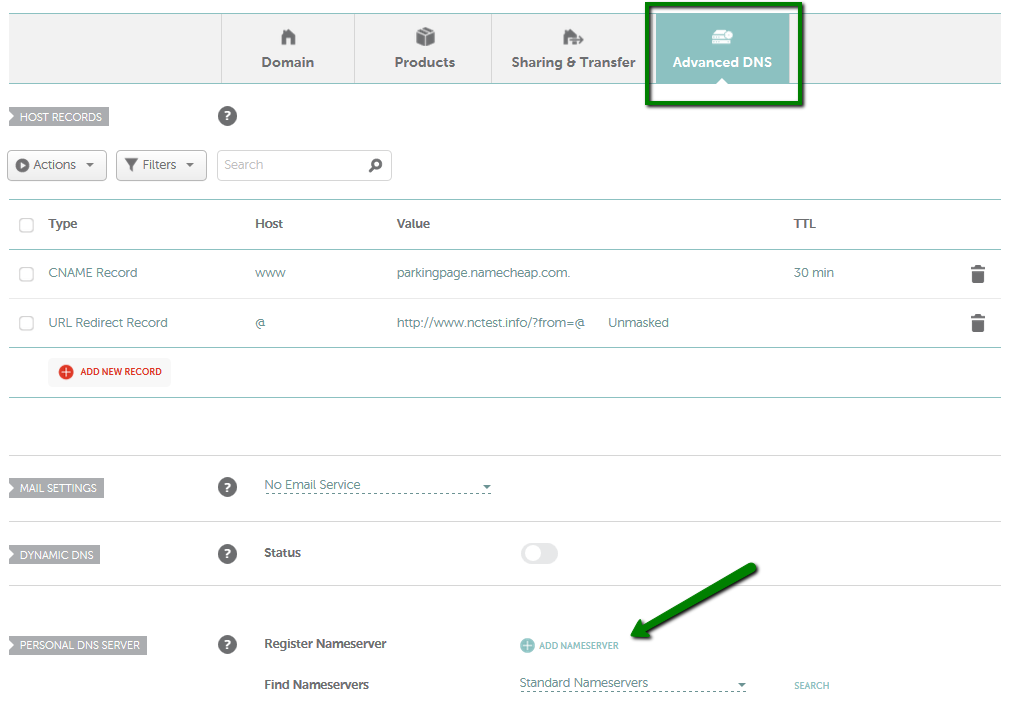
On the domain details page, locate the “Advanced DNS” tab. Click on it to view DNS settings. This section allows you to customize DNS records as needed.
Credit: www.namecheap.com
Navigating To Dns Settings
Access DNS settings on Namecheap to add custom DNS. Log in, navigate to ‘Domain List’, and click ‘Manage’. Find ‘Advanced DNS’, then enter your custom DNS details. Save changes to complete the setup. This process ensures your domain uses the specific DNS servers you choose.
Navigating through Namecheap to adjust your DNS settings might seem daunting at first, but it’s simpler than you think. With just a few clicks, you can customize your DNS settings to suit your needs. Whether you’re redirecting your domain to another website or setting up email forwarding, understanding how to access these settings is crucial. ### First, you’ll need to log in to your Namecheap account. Enter your username and password on the Namecheap homepage. Once you’re logged in, you’ll find yourself on the dashboard, which is the gateway to all your domain settings. ###Finding Your Domain List
On the dashboard, look for the “Domain List” option on the left-hand side. This section shows all the domains you own. Click on it to view your domains and select the one you wish to configure. ###Accessing Domain Management
Once you’ve selected your domain, click on the “Manage” button next to it. This will take you to the domain management page. Here, you can see a variety of options related to your domain. ###Locating Dns Settings
On the domain management page, you’ll find several tabs. Look for the “Advanced DNS” tab. Clicking on this tab will reveal your current DNS settings and allow you to make changes. ###Customizing Your Dns Settings
Now that you’re in the DNS settings, you can add or modify DNS records. Need to add a new A record or change your MX records? Simply click the “Add New Record” button. Remember, any changes you make might take a few hours to propagate. Patience is key here. ###Checking For Errors
After making your changes, it’s important to check for errors. Namecheap usually highlights any issues in red. Make sure everything is correct to avoid disruptions. Have you ever made a DNS change and noticed it didn’t work immediately? That’s common! DNS changes often take some time to update globally. Navigating DNS settings might initially feel complex, but with practice, it becomes second nature. Have you tried adjusting your DNS settings before? What challenges did you face, and how did you overcome them?Configuring Custom Dns Records
Adding custom DNS to Namecheap enhances website control and flexibility. Access the Namecheap dashboard, select your domain, and navigate to DNS settings. Enter the desired DNS records, save changes, and update your domain’s configuration effortlessly.
Configuring custom DNS records on Namecheap can seem overwhelming, but with the right guidance, it’s a straightforward process. Whether you want to host your own website or customize email settings, adding custom DNS records is a crucial step. Understanding how DNS settings work will empower you to make informed decisions about your online presence.Understanding Dns Records
DNS records are like the contact list of the internet. They direct traffic from your domain name to the right server. Each record type has a specific function. For example, A records point your domain to an IP address, while MX records direct email traffic. Knowing what each record does helps you configure your settings correctly.Accessing Dns Settings On Namecheap
Log into your Namecheap account to access DNS settings. Navigate to the “Domain List” section and find your domain. Click the “Manage” button next to it. You’ll find the “Advanced DNS” tab in the domain settings. This is where the magic happens. Have you ever wondered how a few clicks can change where your domain points?Adding A New Dns Record
Once in the “Advanced DNS” tab, you can start adding new records. Click the “Add New Record” button to begin. Choose the type of record you need. Enter the necessary details such as hostname, value, and TTL. Double-check your entries to avoid errors. Imagine the satisfaction of seeing your website live after completing these steps.Modifying Existing Dns Records
To modify existing records, locate the record you want to change. Click on the pencil icon to edit. Update the fields with new information. Save your changes and wait for the DNS propagation. Did you know it can take up to 48 hours for changes to take effect?Deleting Unused Dns Records
Keeping your DNS records clean is crucial. Delete any unused or outdated records. Hover over the record and click the trash can icon to remove it. This helps prevent conflicts and ensures your domain functions smoothly. Why let clutter slow down your digital space?Testing Your Dns Configuration
After configuring your DNS records, always test your settings. Use online tools like DNS Checker to verify your changes. This ensures everything points correctly and avoids downtime. Are you ready to see your updates in action? By understanding and managing your DNS records, you take control of your domain’s functionality. Each step you take brings you closer to mastering your online presence. Are you excited to apply these insights and see the results?Credit: help.mailgun.com
Frequently Asked Questions
How Do I Set A Custom Dns?
To set a custom DNS, access your device’s network settings. Choose your connection, find DNS settings, and enter your preferred DNS addresses. Save changes and restart your connection to apply the new settings.
How To Set Up Private Nameservers On Namecheap?
Log in to Namecheap. Go to “Domain List. ” Click “Manage” next to your domain. Select “Advanced DNS. ” Add your desired private nameservers. Save changes.
How To Point To Basic Dns Namecheap?
To point to Namecheap DNS, log into your account. Select “Domain List,” then “Manage. ” Under “Nameservers,” choose “Namecheap Basic DNS. ” Save changes.
How Do I Add A Dns To My Domain?
To add a DNS to your domain, log into your domain registrar’s control panel. Navigate to the DNS settings section. Enter the new DNS records you received from your hosting provider. Save changes and allow time for propagation.
Conclusion
Adding custom DNS to Namecheap is simple and straightforward. Follow the steps carefully. Ensure your DNS settings match your hosting provider’s instructions. This improves website performance and reliability. Managing DNS effectively enhances user experience. Keep your DNS records updated regularly.
Regular checks prevent potential issues. Namecheap makes DNS management user-friendly and efficient. Explore its tools for better control. Remember, DNS plays a vital role. A well-configured DNS ensures seamless online presence. Always prioritize accuracy in your settings. With these tips, manage your DNS confidently.
Your website deserves smooth operation and reliability.
