
Are you looking to expand your online presence with Namecheap? Adding a subdomain can be a game-changer for organizing your website content or launching a new project.
Imagine having a dedicated space for your blog, store, or portfolio, all while keeping your main domain intact. It’s easier than you might think, and the benefits are immense. In this guide, you’ll learn how to effortlessly create a subdomain using Namecheap’s platform.
Whether you’re a newbie or a seasoned webmaster, this step-by-step process is designed with you in mind. You’ll gain control, enhance your site’s functionality, and keep your visitors engaged. Dive in to discover how simple it is to leverage subdomains for your digital growth.
Setting Up Your Namecheap Account
Easily add a subdomain in Namecheap by logging into your account and accessing the domain list. Navigate to the “Advanced DNS” tab, then click “Add New Record. ” Follow the prompts to enter your subdomain details and save changes.
Setting up your Namecheap account is a straightforward process that can open up a world of possibilities for your online presence. Whether you’re a seasoned webmaster or a newbie stepping into the digital space, getting your account ready is the first step in adding a subdomain. With a few clicks and keystrokes, you can have your Namecheap account set up and ready to go. ###Creating Your Namecheap Account
To start, head over to Namecheap’s website. You’ll find the ‘Sign Up’ button on the top right corner. Click it, and a simple form will prompt you for your details. A valid email address is crucial because this is how Namecheap will communicate with you. ###Verifying Your Email
Once you fill in your details, Namecheap sends a verification email. Check your inbox and click the link to activate your account. This step ensures that your email is valid and confirms your identity. ###Navigating The Dashboard
After verifying your email, log into your account. You’ll be greeted by a user-friendly dashboard designed to simplify your tasks. Take a moment to explore the layout; familiarity can save you time in future endeavors. ###Securing Your Account
Security is crucial for your online activities. Set up two-factor authentication in your Namecheap account for added protection. This extra layer of security helps safeguard your account from unauthorized access. ###Funding Your Account
While adding a subdomain is free, you’ll need funds for other services. Consider linking a payment method to your account. This ensures you’re ready to purchase domains or additional services whenever you need them. ###Understanding The User Settings
Your account settings allow you to personalize your experience. Adjust notifications to receive alerts about important updates and offers. These settings keep you informed and help manage your account effectively. ###Exploring Support Options
Questions and issues are inevitable. Namecheap offers extensive support options, including live chat and a knowledge base. Don’t hesitate to reach out if you need assistance or have questions about your account. ###Reflecting On Your Needs
Before adding a subdomain, think about your project’s goals. How will a subdomain serve your purpose? Understanding this can guide your decisions and set the foundation for success. Setting up your Namecheap account is a simple yet significant step. It’s the gateway to managing your domains effectively. By investing a little time in setting up, you prepare yourself for a seamless experience in managing your online assets. Have you ever considered how a well-organized account can impact your digital strategy?
Credit: thomasgauvin.com
Navigating The Domain Dashboard
Adding a subdomain in Namecheap starts with mastering the domain dashboard. This tool holds the key to managing your domains efficiently. Navigating it effectively is crucial for setting up subdomains. The dashboard provides a user-friendly interface. It helps you manage domain settings with ease. Understanding its features can streamline your domain management tasks.
Accessing Your Domain List
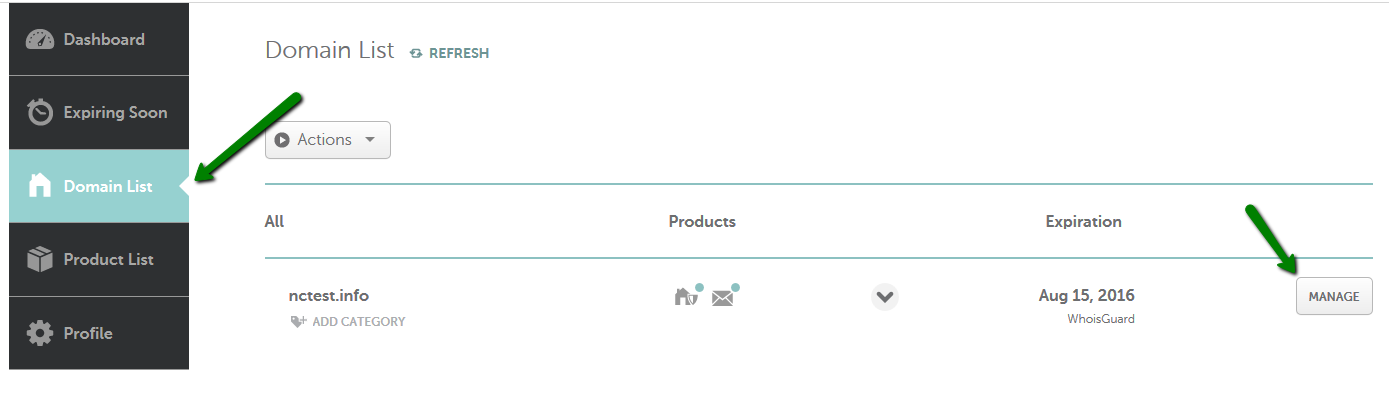
First, log into your Namecheap account. Locate the “Dashboard” on the homepage. Click to open the domain list. This area shows all domains you own. Select the domain where you want to add a subdomain. Ensure the domain is active and not expired.
Finding The Domain Management Area
After selecting your domain, find the “Manage” button. Click it to enter the domain management area. Here, you can view various options. Look for the “Advanced DNS” tab. This tab is essential for adding a subdomain.
Understanding Dns Settings
Under “Advanced DNS,” explore the settings. These settings control your domain’s DNS records. You need to add a new record here. Choose “Add New Record” to begin. Select the type as “CNAME” or “A Record” based on your needs.
Configuring The Subdomain
Enter your subdomain name in the record field. Specify the target domain or IP address. Ensure the details are correct. Save changes to finalize the setup. Your subdomain should now be active.
Creating And Configuring The Subdomain
Creating and configuring a subdomain in Namecheap can enhance your website’s organization. A subdomain acts as a separate section of your main domain. This can be useful for hosting a blog, store, or other service. Configuring a subdomain is an easy process with Namecheap. Follow these steps to get started.
Accessing Your Namecheap Account
Log in to your Namecheap account. Navigate to the dashboard. Find the domain you want to modify. Click on “Manage” next to the chosen domain.
Navigating To The Domain List
In the dashboard, select the “Domain List” tab. This displays all your registered domains. Choose the domain you wish to add a subdomain to.
Accessing Advanced Dns Settings
Click on the “Advanced DNS” tab. This section allows you to manage DNS settings. Locate the “Host Records” section to proceed.
Adding A New Record
In the “Host Records” section, click “Add New Record”. Choose “A Record” from the dropdown menu. Enter your desired subdomain in the “Host” field.
Configuring The Ip Address
Enter the IP address of your server in the “Value” field. Ensure the TTL (Time to Live) is set to “Automatic”. This ensures efficient DNS updates.
Saving Your Changes
Click the green checkmark to save your changes. Your subdomain is now configured. Allow some time for DNS propagation.
With these steps, your subdomain setup is complete. You can now use it for various purposes. Enjoy the flexibility it offers!

Credit: hostadvice.com
Credit: www.namecheap.com
Frequently Asked Questions
How Do I Add A Subdomain To Namecheap?
Log in to Namecheap, access Domain List, click “Manage” next to your domain, and select “Advanced DNS. ” Add your subdomain under the Host Records section by clicking “Add New Record. ” Choose “A Record” or “CNAME Record” and fill in the required details.
Save changes.
Is A Subdomain Bad For Seo?
Subdomains aren’t inherently bad for SEO. They can rank well if optimized properly. Search engines treat subdomains as separate entities, requiring distinct strategies. Focus on quality content and proper linking to enhance visibility. Ensure each subdomain serves a specific purpose to avoid content duplication and confusion.
How To Connect A Subdomain To Hosting?
Log in to your hosting control panel. Navigate to DNS settings. Add a new A record for the subdomain, pointing to your server’s IP address. Save changes. Wait for DNS propagation.
How Do I Point A Subdomain To Another Domain?
To point a subdomain to another domain, update DNS settings. Create a CNAME record for the subdomain, directing it to the target domain. Access your domain registrar’s DNS management tool to make changes. Ensure propagation by checking the subdomain’s connection with the new domain after modifications.
Conclusion
Adding a subdomain in Namecheap is straightforward. Follow the steps to enhance your website. Subdomains help organize content and improve user experience. They also assist in targeting specific audiences. Always ensure your DNS settings are correct. Mistakes can lead to downtime.
Subdomains are useful for testing new features too. Remember to check your subdomain regularly. This ensures it works properly. Troubleshooting early prevents bigger issues later. With practice, managing subdomains becomes second nature. Dive in and explore the potential of your website today.
Keep learning and adapting for best results.
