Are you tired of the standard button colors on your WordPress site? Do you want to add a personal touch or match your brand’s color scheme?
Changing button colors might seem like a small tweak, but it can have a significant impact on your website’s design and user experience. Imagine your call-to-action buttons popping with vibrant hues that grab attention and drive clicks. This is not just about aesthetics; it’s about making your site more engaging and effective.
You don’t need to be a coding wizard to make these changes. You’ll discover simple, step-by-step methods to customize button colors in your WordPress theme. Get ready to transform the look and feel of your site effortlessly. Let’s dive in and unlock the potential of your WordPress theme!
Credit: wedevs.com
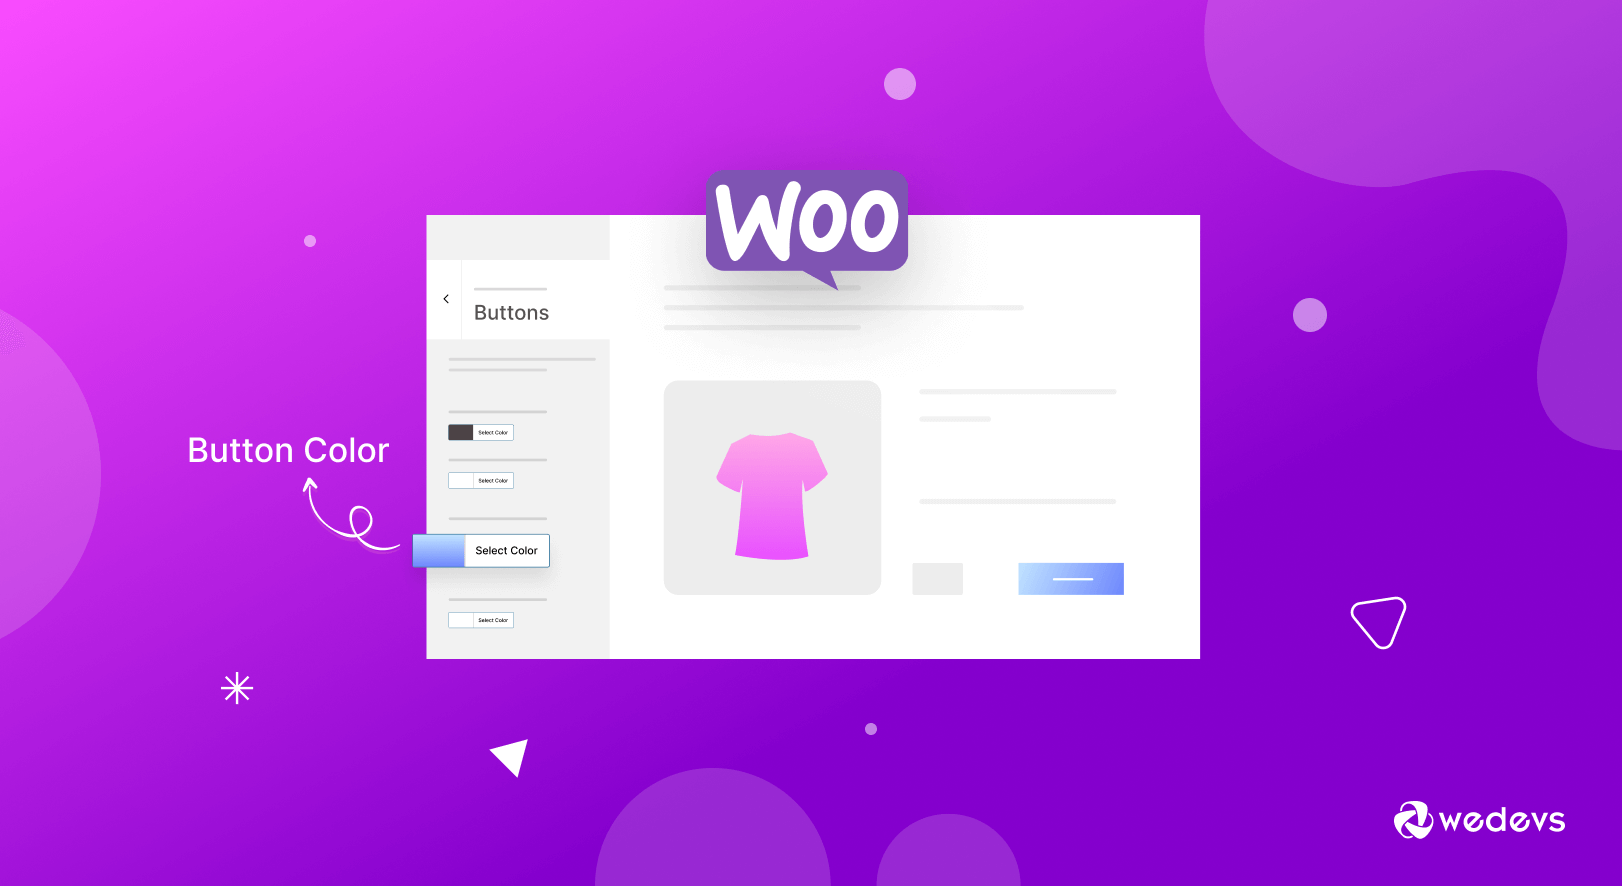
Customizing Button Colors
Changing button colors in your WordPress theme is simple. Navigate to the theme customizer and locate the color settings. Adjust the button colors to match your website’s design and branding effortlessly.
Accessing Theme Customizer
Changing button colors is easy. Start by logging into your WordPress dashboard. Look for the Appearance section on the left menu. Click on it, then choose Customize. This opens the Theme Customizer. Here, you can see many options. Find the one labeled Colors or Buttons. Click on it to open the settings. You can now change the button colors. Choose a color from the palette. Once done, click Publish to save changes. Your buttons will now have a new look!
Using Additional Css
Sometimes, the theme customizer doesn’t have options for button colors. You can still change them using Additional CSS. Go back to the Customizer and find Additional CSS at the bottom. Click on it to open a text area. Here, you can add custom CSS code. Use code like button { background-color: #yourcolorcode; }. Replace #yourcolorcode with your desired color. After typing the code, click Publish. Your buttons will now show the new color!
Editing Theme Files
Locating Relevant CSS Files can be a simple task. Start by accessing the WordPress dashboard. Go to the “Appearance” section. Click on “Theme Editor.” Look for the style.css file in the list. This file often controls button colors. Use the search bar to find specific CSS rules. Look for properties like background-color and color. These affect button colors directly. Sometimes, themes have custom CSS files. These may be in a “css” folder. Check for files named custom.css or theme.css. These files might also hold button styles.
Modifying CSS Code requires care. Always backup your theme files first. Find the CSS rule for the button you want to change. Change the background-color to your desired color code. Use a color picker tool if needed. Save changes and refresh your site. Check if the button color has changed. If not, clear your browser cache. Sometimes themes use !important tags. These override your changes. Remove them if needed, but be cautious. Test your changes on different devices. Make sure the color looks good everywhere.
Using Child Themes
Create a child theme to keep your changes safe. This way, updates won’t remove them. First, make a new folder in the wp-content/themes directory. Name it after your theme with -child at the end. Next, create a style.css file inside. Add a comment at the top with the parent theme’s name. Now, the child theme is ready.
Find the button style in your parent theme. Copy the CSS rules for the buttons. Paste them into the child theme’s style.css file. Change the color values to your desired ones. Save the file and check your site. The buttons should now have new colors. If not, clear your browser cache and refresh.
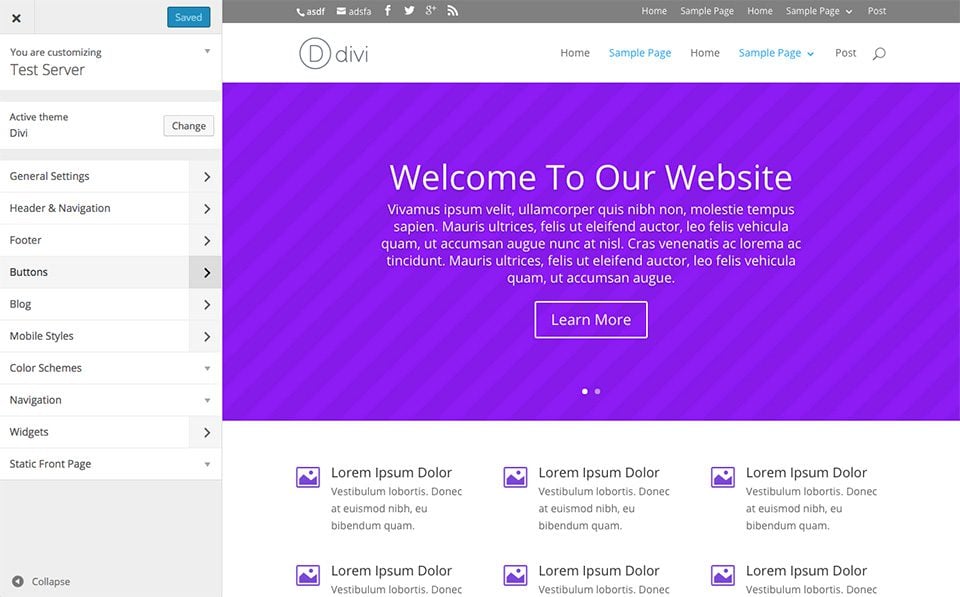
Credit: www.elegantthemes.com
Utilizing Plugins
Easily change button colors in your WordPress theme by utilizing plugins. These tools simplify customization without coding skills. Choose the right plugin, install it, and follow the instructions to adjust button styles.
Popular Color Customization Plugins
Plugins help change button colors. Simple CSS can change colors easily. Colorlib is popular for themes. It helps make buttons pretty. Try Yellow Pencil. It lets you edit colors live. No coding needed. CSS Hero is also good. It is easy for beginners. It offers many options. These plugins make color changing fun and simple. Choose one that you like.
Installing And Configuring Plugins
First, go to your WordPress dashboard. Find and click on “Plugins”. Search for the plugin name. Click on “Install Now”. Wait for it to install. Then click “Activate”. Find the plugin settings. Adjust colors as you wish. Save your changes. Check your website. Buttons should now show new colors. Remember to save your work. Enjoy your colorful buttons!
Testing Changes
Previewing Updates helps you see your button color changes. Use the WordPress Customizer to test colors. Click on the “Preview” button to see live changes. This shows your website with the new colors. Check if the colors match your theme.
Ensuring Compatibility Across Devices is very important. Your buttons should look good on all screens. Use different devices to check your website. Try a phone, tablet, and computer. This helps make sure buttons are clear and readable. Adjust colors if needed for better visibility.
Troubleshooting Common Issues
Changing button colors in a WordPress theme often involves adjusting the CSS. Locate the theme’s customizer in the dashboard. Find the Additional CSS section to add your custom code for new button colors.
Identifying Conflicting Styles
Sometimes, themes have their own style settings. These settings might clash with custom changes. Check your theme’s style.css file. Look for any button color rules. If you find them, update these rules. This ensures your new button color shows up. Also, check your WordPress Customizer. Some themes allow color changes there. This way, you can easily update button colors without code.
Resolving Cache Problems
After changing button colors, your site might not show the update. This can happen if the cache is not cleared. Clear your browser cache first. Then, clear the WordPress cache. Use a plugin if needed. This helps the new style to show up. Without clearing cache, changes might stay hidden. Remember, clearing cache helps visitors see the new button color too.
Credit: themelooks.com
Frequently Asked Questions
How Do I Change The Color Of The Button In WordPress Theme?
Go to WordPress dashboard and select “Appearance” then “Customize. ” Click “Additional CSS” and add custom CSS code to change the button color. Save changes.
How Do I Customize A Button In WordPress?
To customize a button in WordPress, use the block editor. Select the button block, adjust text, color, and style. For advanced styling, add custom CSS in the WordPress Customizer or theme settings. Plugins like Elementor offer more design options for button customization.
How To Change Button Hover Color In WordPress?
To change button hover color in WordPress, add custom CSS in Appearance > Customize > Additional CSS. Use code: `. button:hover { background-color: #yourcolor; }`. Replace `#yourcolor` with your desired color code. Save changes to apply.
How Do I Change The Color Of The Download Button In WordPress?
Edit the button’s CSS in your theme or use a plugin like “Custom CSS” to change the color. Access “Appearance” > “Customize” > “Additional CSS” to add your custom code. Adjust the color by specifying the desired HEX or RGB color value in the CSS.
Conclusion
Changing button colors in your WordPress theme is simple and rewarding. First, identify the right CSS class for your buttons. Next, use the WordPress customizer or a child theme. This allows easy style changes. Make your website more visually appealing with new colors.
Experiment with different shades to find what suits your brand. Remember, consistency is key for a professional look. Your website should reflect your personal style and vision. With these steps, button color changes are within reach. Happy customizing!