
You might find yourself in a situation where you need to cancel a domain you registered on Namecheap. Whether it’s because your business needs have changed or you’ve decided on a different domain name, taking the right steps to cancel can save you time and money.
Navigating through Namecheap’s cancellation process doesn’t have to be confusing or stressful. By understanding the steps clearly, you ensure a seamless experience, avoiding any unwanted charges or renewals. You’ll discover how to efficiently manage your domains, ensuring you’re in complete control of your online presence.
Let’s dive into the straightforward process of canceling your domain on Namecheap, so you can move forward with confidence.

Credit: www.youtube.com
Accessing Your Namecheap Account
To cancel a domain on Namecheap, log into your account. Go to the “Domain List” section. Find the domain you wish to cancel and select “Manage. ” Then, choose the option to cancel the domain and follow the prompts.
Accessing your Namecheap account is the first step in cancelling a domain. This process is straightforward but requires a bit of guidance if you’re unfamiliar with Namecheap’s interface. Let’s walk through the steps to ensure you can navigate your account efficiently. ###Logging Into Your Account
First, you need to log in to your Namecheap account. Do you remember your login credentials? It’s the key that opens the door to your domain settings. Head over to the Namecheap website and click on the “Sign In” button located at the top right corner. Enter your username and password, and press “Login.” If your credentials slip your mind, don’t worry. Click “Forgot password” to receive an email with instructions to reset it. It’s quick and keeps your account secure. ###Finding Your Domain List
Once logged in, navigate to your dashboard. You’ll see a variety of options. Your focus should be on the “Domain List” tab. Click on it to view all domains registered under your account. This is where the magic happens. Are you curious about how many domains you actually own? Seeing them listed might surprise you. This section provides an overview and helps you identify the domain you wish to cancel. ###Selecting The Domain To Cancel
With your domain list open, identify the domain you wish to cancel. Click on the domain name, which will direct you to its management page. Here, you have control over the domain’s settings and status. Have you ever wondered why you wanted that domain in the first place? Revisiting its management page might remind you of the initial purpose. But now, you’re ready to move on. ###Accessing Domain Management Settings
In the domain management page, look for the settings icon or tab. This is where you can make changes or request cancellation. It’s often marked clearly, so you won’t miss it. Did you know that managing domain settings is like having a toolbox? Each tool serves a unique purpose, and knowing where they are ensures you can efficiently cancel your domain. ###Confirming Your Domain Cancellation
Finally, follow the prompts to confirm your domain cancellation. You’ll be asked to verify your decision. Double-check to ensure you’re cancelling the correct domain. It’s a final step that protects you from accidental deletions. Have you considered why cancelling this domain is necessary? Reflect on your choices. Once confirmed, your domain will no longer be active. Accessing your Namecheap account is a journey. Each step brings you closer to managing your domains effectively. Are you ready to take control and make informed decisions?Navigating To Domain Management
Canceling a domain on Namecheap starts with accessing domain management. This process involves a few straightforward steps. Ensuring you’re in the right section is crucial. Let’s dive into the details.
Understanding Your Dashboard
Log in to your Namecheap account. The dashboard will display various options. It’s your main control center. Familiarize yourself with its layout. This will help you navigate efficiently.
Finding The Domain List
Look for the “Domain List” tab on the left panel. Click on it. This section shows all your registered domains. It helps in managing each domain individually. Locate the domain you wish to cancel.
Accessing Domain Management Settings
Next, click on “Manage” next to your domain. This will lead you to the domain management page. Here, you can adjust settings and manage domain details. Take a moment to explore the options available.
Completing The Cancellation Process
Canceling a domain on Namecheap is simple. Access your account, find the domain, and choose the cancellation option. Follow the prompts to complete the process swiftly.
Completing the cancellation process for a domain on Namecheap might seem daunting, but it’s a straightforward task once you know the steps. Whether you’re downsizing your digital footprint or simply moving on to new projects, understanding how to cancel a domain efficiently can save you time and hassle. Here’s how you can navigate this process smoothly.Access Your Namecheap Account
First, log into your Namecheap account. Once inside, head over to the dashboard where all your domains are listed. Locate the domain you wish to cancel and click on it. This will take you to the domain settings page, a familiar place if you’ve managed domains before.Find The Domain’s Details
In the domain settings, you’ll see various options. Look for the “Domain Details” section. This area contains all the critical information about your domain, including its expiration date and current status. Make sure you’ve selected the correct domain to avoid any mishaps.Initiate The Cancellation
Now, it’s time to start the cancellation process. Find the cancellation option within the domain settings. It’s usually a button or a link labeled “Cancel Domain” or something similar. Clicking this will prompt a confirmation message to ensure you’re making the right decision.Confirm Your Decision
Once you’ve initiated the cancellation, Namecheap will ask you to confirm your decision. They might inquire about the reason for cancellation. This step is crucial as it’s the last point where you can change your mind. Confirming will officially set the cancellation in motion.Check For Confirmation Email
After confirming, keep an eye on your email. Namecheap will send a confirmation email detailing the cancellation. It’s important to read this email carefully. It will include information about when the domain will officially be deactivated.Reflect On The Decision
Now that you’ve completed the process, take a moment to reflect. Was this the right decision for your online strategy? Consider the benefits of a streamlined domain portfolio versus the potential need for that domain in the future. Making informed decisions now can prevent regrets down the road. By carefully following these steps, you can ensure a smooth cancellation process. If you encounter any issues, Namecheap’s customer support is always ready to assist. Have you ever had to cancel a domain before? What was your experience like?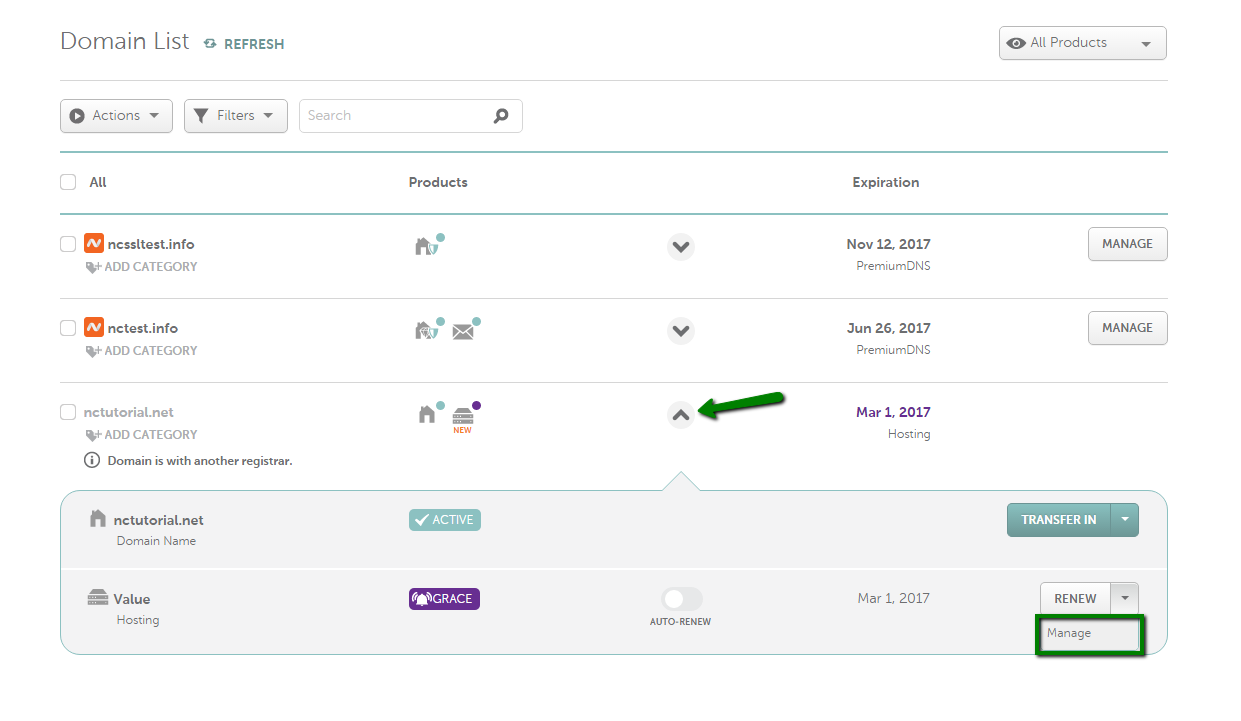
Credit: www.namecheap.com

Credit: www.youtube.com
Frequently Asked Questions
How Do I Cancel A Domain In Namecheap?
Log in to your Namecheap account. Go to the “Domain List” section. Select the domain you want to cancel. Click “Manage” and choose “Cancel Domain. ” Confirm your cancellation request.
How Do I Delete An Existing Domain?
To delete a domain, log into your domain registrar account. Navigate to the domain management section. Select the domain you wish to delete, then follow the provided steps to remove it. Confirm the deletion to complete the process. Always check for specific guidelines from your registrar.
How Do I Terminate A Domain?
To terminate a domain, contact your domain registrar. Access your account, navigate to domain settings, and follow the cancellation process. Confirm termination and ensure any necessary backups.
How Do I Delete A Website From Namecheap?
Log into your Namecheap account. Navigate to the “Domain List”. Select the website. Click “Manage”. Scroll down and click “Delete”. Confirm the deletion to remove the website permanently.
Conclusion
Canceling a domain on Namecheap is straightforward. Follow the steps carefully. Check your domain details before proceeding. Make sure to save any important data. Once canceled, the domain can’t be restored. Consider contacting Namecheap support for assistance if needed. Always verify your decision before canceling.
Double-check the cancellation process. This ensures everything goes smoothly. Managing domains requires attention to detail. Stay informed and make wise choices. Keep your domain management simple. Focus on what matters most. Your online presence is important. Protect it wisely. Remember, careful planning prevents future issues.
