
Are you ready to take your online presence to the next level? Associating your Namecheap domain with KnownHost is a crucial step in building a professional and credible website.
Whether you’re launching a new blog, an online store, or a portfolio, getting your domain and hosting to work together seamlessly is essential. But don’t worry, this process is easier than you might think. Imagine the satisfaction of seeing your unique domain name leading visitors to your beautifully crafted website.
Sounds exciting, right? In this guide, we’ll walk you through each step, ensuring you avoid common pitfalls and get everything set up smoothly. You’ll discover not only the how, but also the why, helping you make informed decisions along the way. So, if you’re ready to transform your vision into reality, let’s dive in and get started!

Credit: www.webhostingsun.com
Choosing The Right Domain Settings
Associating a Namecheap domain with KnownHost requires updating DNS settings. Begin by accessing your Namecheap account. Locate your domain and select “Manage. ” Adjust DNS settings to point to KnownHost’s nameservers. This ensures your domain directs to the correct hosting server, optimizing your website’s accessibility and performance.
Choosing the right domain settings is crucial when you’re linking your Namecheap domain to Knownhost. It might sound like a technical task, but with the right steps, it becomes straightforward. You want to ensure your domain is set up correctly so your website runs smoothly and efficiently.Understanding Dns Records
Knowing your DNS records is vital. DNS, or Domain Name System, is like the phonebook of the internet. It translates domain names into IP addresses. You need to configure your DNS records properly to connect your domain to Knownhost’s servers. This ensures that your website is accessible to users all over the world. Ever had a friend call you by the wrong name? That’s how a website feels when DNS records are incorrect.Adjusting Name Servers
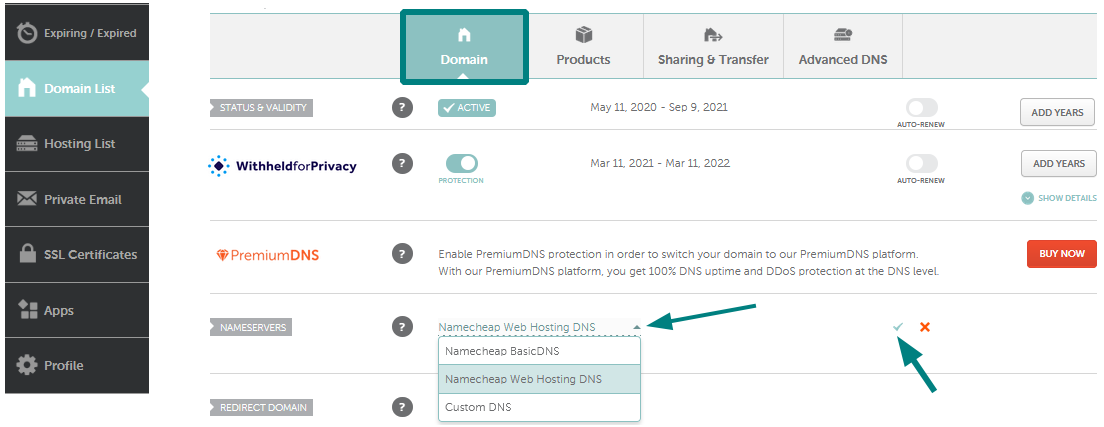
To connect your Namecheap domain to Knownhost, you’ll often need to change your domain’s name servers. Name servers direct where your domain’s traffic should go. Log into your Namecheap account and find the domain you want to adjust. Switch the name servers to those provided by Knownhost. Doesn’t it feel satisfying when things just click into place? That’s what happens when your name servers are set correctly.Configuring A And Cname Records
A Records point your domain to an IP address. CNAME Records allow you to alias one name to another. Both play a role in domain configuration. In your Namecheap dashboard, navigate to the DNS settings to add or edit these records. Ensure they match the details given by Knownhost. It’s like setting up a direct line from your domain to your web host. Precision here saves a lot of headaches later.Enabling Ssl/tls Certificates
SSL certificates encrypt data between your website and its visitors. They’re essential for security. Ensure your domain settings allow for easy installation of SSL/TLS certificates through Knownhost. This might involve adjusting a few DNS settings. Isn’t online security one of your top concerns? A secure site builds trust with your visitors.Checking Propagation Times
Domain changes don’t happen instantly. Propagation can take up to 48 hours. During this time, changes spread across global servers. Be patient and give it time. Ever waited for bread to rise? It’s similar, but the wait is worth it.Choosing the right domain settings isn’t just about technicalities; it’s about ensuring your online presence is solid and reliable. Have you ever struggled with domain settings before? Understanding these components can save you from future challenges and enhance your website experience.
Updating Dns Records
Updating DNS records is crucial for connecting your Namecheap domain to KnownHost. This process allows your domain to communicate with the web hosting server effectively. By updating DNS records, you ensure that your domain points to the correct server, enhancing the website’s accessibility and performance.
Step 1: Access Your Namecheap Account
Log in to your Namecheap account. Navigate to the “Domain List” section. Select the domain you wish to update. Click on “Manage” beside the domain name. This leads you to the domain’s management page.
Step 2: Locate The Dns Settings
Once on the management page, find the “Advanced DNS” tab. Click on this tab to access DNS settings. Here, you can view and modify existing DNS records.
Step 3: Update Dns Records
Identify the records that need updating. Typically, these include A, CNAME, and MX records. Click on the existing records to edit them. Replace the old values with the new ones provided by KnownHost.
Step 4: Save Changes
After updating the records, click “Save” to apply changes. Ensure all entries are correct before saving. Double-check for typos or incorrect values.
Step 5: Wait For Propagation
DNS changes take time to propagate. This process can take up to 48 hours. During this period, your website may experience intermittent accessibility. Be patient and check back later.
Verifying Domain Connection
After successfully associating your Namecheap domain with KnownHost, verifying the connection is crucial. This step ensures that your domain is properly linked and your website is accessible. A smooth verification process helps maintain website functionality and avoids potential downtime.
Check Dns Settings
Access your Namecheap account dashboard. Locate the DNS settings section. Confirm that the Name Servers point to KnownHost’s servers. Correct settings are essential for seamless connectivity.
Use Online Tools
Utilize online DNS check tools. These tools verify if your domain is correctly pointing to KnownHost. They provide detailed reports about DNS configurations.
Review Propagation Status
Domain DNS changes need time to propagate globally. Check the propagation status. Ensure your domain is accessible from different locations. Propagation might take up to 48 hours.
Test Website Accessibility
Visit your domain using a web browser. Ensure the website loads properly. Test different pages to confirm functionality. This ensures your domain is correctly connected.
Contact Support If Needed
If issues persist, contact KnownHost or Namecheap support. They offer assistance to resolve connection problems. Professional help ensures your domain functions smoothly.

Credit: www.webhostingsun.com
Credit: www.namecheap.com
Frequently Asked Questions
How To Connect Namecheap Domain To Hostinger?
Update your Namecheap domain’s DNS settings to point to Hostinger’s nameservers. In Hostinger, add your domain. Wait for DNS propagation to complete, which can take up to 48 hours.
How To Link A Domain To Hosting?
To link a domain to hosting, update the domain’s DNS settings. Enter your hosting provider’s nameservers in your domain registrar account. Save the changes and allow 24-48 hours for DNS propagation. This connects your domain to your hosting account effectively.
How To Use Namecheap To Host?
Sign up for a Namecheap account. Purchase a hosting plan. Log into your account. Link your domain to the hosting package. Upload website files via the cPanel or FTP. Configure settings as needed. Your website is now hosted on Namecheap.
How To Point Namecheap Domain To Godaddy Hosting?
Change your Namecheap domain’s nameservers to GoDaddy’s. Log into Namecheap, select your domain, and update DNS settings. Use GoDaddy’s provided nameservers. Save changes, then wait for propagation. Your domain will point to GoDaddy hosting.
Conclusion
Connecting your Namecheap domain to KnownHost is simple. Follow the steps. Update your DNS settings. Use the KnownHost nameservers. Wait for the changes to propagate. This process can take some time. Be patient. Once complete, your domain will point to your KnownHost server.
You’ll gain full control over your website. Manage your online presence more effectively. Need help? Contact Namecheap or KnownHost support. They are there to assist. Enjoy your seamless website hosting experience!
