
Are you eager to get your Web API live for the world to see, but unsure about the steps involved in hosting it on IIS? You’re in the right place.
Understanding how to host your Web API in IIS can seem daunting at first, but it doesn’t have to be. Imagine the satisfaction of seeing your application running smoothly, accessible to users across the globe, all because you took the right steps to host it effectively.
This guide will break down each step, making the process straightforward and manageable. By the end, you’ll have the confidence and knowledge to host your Web API on IIS with ease. So, let’s dive in and transform your project into a live service that stands out!

Credit: www.youtube.com
Setting Up Iis
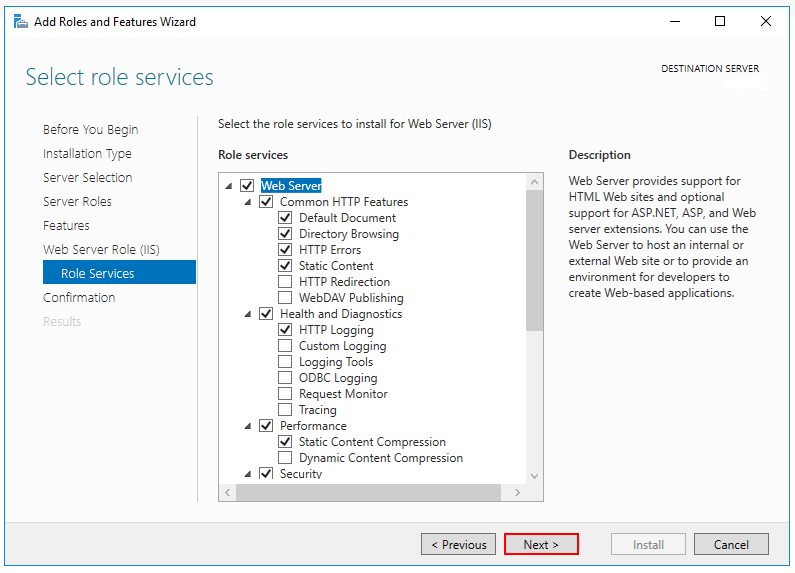
First, open Control Panel on your computer. Find Programs and Features. Click on it. Look for Turn Windows features on or off. Click it. Wait for a new window to open. Find Internet Information Services (IIS) in the list. Check the box next to it. Click OK. Windows will install IIS. This may take some time. Be patient. Once done, restart your computer. IIS is now ready to use.
Open IIS Manager from the start menu. Find your computer name on the left panel. Click on it. Select Sites. Right-click and choose Add Website. Enter a name for your site. Choose a Physical Path where your files are. Set the Host Name if needed. Click OK. Your site is now set up. Test it by typing the URL in a browser.

Credit: exceptionnotfound.net
Preparing Web Api
Create a new project in Visual Studio. Choose Web API template. Name your project. Click Create. Add your controllers. Write your API methods. Test your API locally. Make sure it works. Check for errors. Fix any issues. Your project is ready. Save your changes.
Open your project in Visual Studio. Select Build from menu. Choose Publish. Select the folder option. Choose a folder path. Click Publish. Wait for the process. Your files are ready. Check the folder. You will see your API files. Now, you can host them.
Deploying To Iis
Start by opening the IIS Manager. Find the Application Pools section. Click Add Application Pool. Give your pool a clear name. Choose the .NET CLR Version. Pick Integrated for the pipeline mode. Click OK to create the pool. Your application pool is now ready.
In IIS Manager, locate Sites. Right-click Sites. Select Add Website. Enter a site name. Choose the Application Pool you created. Select the physical path of your web files. Set the binding type to HTTP. Enter a port number. Click OK. Your website is ready to run.
Configuring Application Settings
Setting up a Web API in IIS involves configuring application settings carefully. Follow step-by-step instructions for a seamless hosting process. Ensure all settings align with your application requirements for optimal performance.
Modify Web Config
First, open the web.config file in your project. This file holds important settings. You will find sections like connectionStrings and appSettings. Make changes to fit your application needs. Ensure the authentication mode is set correctly. Double-check the customErrors setting. This helps in showing error pages. If your application uses a database, verify the connection string. Save changes after editing.
Set Environment Variables
Environment variables are key. They store data your app needs. Open the system settings on your server. Navigate to Environment Variables. Create or edit variables as required. Make sure they match your app’s needs. Common variables include PATH and DATABASE_URL. Properly set variables ensure smooth operation. Changes take effect after saving.
Testing The Deployment
Open a web browser to test the API. Type the API URL in the address bar. Check if the page loads without errors. You should see data or a success message. Use tools like Postman for deeper testing. Enter the API URL in Postman. Hit the send button and wait. Check the response status. A 200 status means success.
Go to the IIS server log files. These files store important information. Open the logs using a text editor. Look for error messages or warnings. Errors will show what went wrong. Fix any issues you find. This helps keep the API running smoothly. Regular log checks prevent big problems. Always save changes after editing.
Credit: learn.microsoft.com
Securing The Web Api
Use HTTPS to keep data safe. It encrypts the information. This means no one can read it. Install an SSL certificate on the server. It helps make the site secure. Always use https:// in your API URLs. This tells browsers it’s safe to visit.
Authentication checks who you are. It keeps bad guys away. IIS supports many types like Windows and Basic authentication. Pick the right one for your needs. Set it up in the IIS manager. Make sure to disable anonymous access. Only the right users can use the API. Test it to ensure it works well. This keeps your API safe and sound.
Troubleshooting Common Issues
Configuration errors can stop your Web API. Check the web.config file first. Look for missing or incorrect settings. Pay attention to connection strings and paths. They are often wrong. Correct these errors and save the changes. Restart the IIS server to apply fixes. If errors persist, verify the application pool settings. Ensure the correct .NET version is selected. Proper configurations lead to smooth hosting.
Permission issues block access to your Web API. Ensure the correct user permissions are set in IIS. The application pool identity should have read and write access to necessary files. Check the folder permissions for your Web API. Use IIS Manager to adjust these settings. Assign the required permissions to the application pool user. This prevents unauthorized access and resolves permission issues. Proper permissions keep your API running.
Optimizing Performance
Caching strategies can help make your web API faster. Store data that doesn’t change often. This means the server doesn’t need to fetch it every time. Use HTTP caching headers like Cache-Control and ETag. These tell browsers what to cache and for how long. Another way is to use in-memory caches. These are quick to access. Examples include Redis or MemoryCache in .NET.
Let’s talk about load balancing techniques. Spread the work across multiple servers. This prevents any one server from being overwhelmed. Use a load balancer like NGINX or Apache. It directs traffic to the least busy server. You can also use round-robin scheduling. It rotates requests evenly across all servers. This keeps things fair and balanced.
Frequently Asked Questions
How To Host A Web Service In Iis Step By Step?
Open IIS Manager, add a new site, and point to your web service folder. Set the binding and application pool. Click ‘Start’ to host the service. Ensure firewall settings allow traffic.
How Do I Host My Web Api?
To host your Web API, choose a reliable hosting service like AWS or Azure. Deploy using Docker for scalability. Ensure proper security measures and set up a domain for accessibility. Regularly monitor performance and update your API for optimal functionality.
How To Host .net 6 Web Api In Iis?
Install. NET Core Hosting Bundle on the server. Publish your Web API project. Create a new site in IIS. Point it to the published folder. Configure application pool to use No Managed Code. Set up bindings. Test by browsing the API in IIS.
How To Host A Website In Iis Step By Step In Windows 11?
To host a website in IIS on Windows 11: Open IIS Manager, create a new site, set the physical path, configure bindings, and start the website. Ensure firewall settings allow traffic, and test the site in a browser.
Conclusion
Hosting a Web API in IIS is straightforward. Follow the steps carefully. Start with setting up IIS on your server. Next, ensure your Web API is ready for deployment. Configure the application pool. Pay attention to authentication settings. Test the API locally first.
Once confident, deploy to IIS. Check everything works as expected. Troubleshoot any issues promptly. Remember, practice makes perfect. Keep learning and improving your skills. You will soon host Web APIs with ease. Happy hosting!


