Are you looking to connect your Namecheap domain with your SiteGround hosting? You’ve come to the right place!
Navigating the digital landscape can be tricky, but getting your domain pointing in the right direction doesn’t have to be. Imagine the satisfaction of seeing your website go live, seamlessly connecting your chosen domain with your hosting. This guide is crafted just for you, providing clear, step-by-step instructions to ensure your domain setup is a breeze.
By the end of this article, you’ll gain confidence in managing your online presence, knowing you’ve mastered a crucial aspect of website creation. So, let’s dive in and make your domain connection as simple and effective as possible!

Credit: www.youtube.com
Choosing The Right Dns Settings
Pointing a Namecheap domain to SiteGround involves changing DNS settings. Start by logging into your Namecheap account. Locate your domain’s DNS settings. Update the nameservers to SiteGround’s provided addresses. Save changes to complete the setup. This ensures your domain directs visitors to your SiteGround-hosted site.
Choosing the right DNS settings is crucial when you’re pointing your Namecheap domain to Siteground. It can impact your website’s speed, reliability, and even security. So, how do you make the right choice? Let’s break it down step-by-step, ensuring your domain is set up for success.Understanding Dns Basics
DNS, or Domain Name System, is essentially the phonebook of the internet. It translates domain names into IP addresses, helping browsers load your site. Think of DNS as the backbone of your online presence. Without proper DNS settings, your website might face downtime or slow loading speeds. Have you ever tried accessing a site only to find it endlessly loading? Incorrect DNS settings could be the culprit.Benefits Of Custom Dns
Custom DNS settings offer more control and flexibility. They allow you to optimize website performance and enhance security features. Ever notice how some websites load quicker than others? Custom DNS settings could be their secret weapon. Moreover, custom settings can help in distributing traffic efficiently, reducing server load. Imagine your website experiencing a sudden surge in visitors. Without custom DNS settings, this could lead to crashes or delays. As you configure your Namecheap domain with Siteground, consider how custom DNS can offer more than just basic functionality. Are you ready to take control and maximize your site’s potential? Remember, the right DNS settings are the foundation of a seamless online experience.Accessing Your Namecheap Account
Accessing your Namecheap account is the first step in pointing your domain to SiteGround. It’s easier than you think and with a few simple clicks, you’ll be on your way to getting your website live. Whether you’re a seasoned webmaster or a beginner, navigating through your Namecheap account is straightforward. Imagine the satisfaction when you see your domain linking seamlessly to your SiteGround hosting, knowing you did it yourself. This is your gateway to digital success, so let’s get started.
Logging Into Namecheap
Start by visiting the Namecheap website. You’ll see the login option at the top right corner. Click it, and enter your account credentials. If you’ve forgotten your password, use the “Forgot Password” link to reset it. Take a moment to check if your login details are correct, as this will save you frustration later.
Once logged in, you’ll find yourself in the Namecheap dashboard. Take a deep breath; you’re in control now. Look around and familiarize yourself with the different sections. This is your digital toolbox, ready for you to make your domain work for you.
Navigating To Domain List
In the dashboard, look for the “Domain List” section in the sidebar. It’s where your domains are listed, ready for you to manage. Click on it, and you’ll see all the domains you own. Do you see your domain? Perfect, you’re on the right track.
Here, you can access each domain’s settings with a simple click. This is where the magic happens—where you point your domain to SiteGround. Take a moment to appreciate how far you’ve come. Your digital journey is unfolding right here.
Why not explore the other settings while you’re here? Familiarity with your domain options can help you in future endeavors. Can you imagine the possibilities when you know what each setting does?
As you navigate, think about the purpose of your website and how linking your domain to SiteGround will serve this purpose. Every click is a step closer to achieving your online goals. Are you ready to proceed?
Updating Dns Settings
Pointing your Namecheap domain to SiteGround involves updating DNS settings. First, log into your Namecheap account and locate the domain list. Select your domain and modify the nameservers to SiteGround’s specified ones. Changes might take a few hours to propagate.
Updating DNS settings is a crucial step when you want to point your Namecheap domain to Siteground. It might sound technical, but it’s simpler than you think. Imagine it as giving directions to your website on where to find its new home. Without these directions, your visitors might get lost in the digital world. Let’s make sure your domain knows exactly where to go.Locating Dns Settings
First, you need to log in to your Namecheap account. Once inside, head to your dashboard where all your domains are listed. Click on the domain you want to point to Siteground. You’ll see an array of options, but your focus should be on the Domain tab. Under this tab, look for the Manage button. Clicking this will reveal the DNS settings. This is where the magic happens.Entering Siteground Name Servers
After locating the DNS settings, you’ll find an area labeled Nameservers. This section might have some default settings from Namecheap. You need to change these to point your domain to Siteground. Switch the nameserver type from Basic DNS to Custom DNS. Now, it’s time to enter the Siteground nameservers. You should have received these when you signed up with Siteground. Typically, they look something like `ns1.siteground.net` and `ns2.siteground.net`. Enter them into the provided fields. Have you ever tried following a GPS when the map isn’t updated? It leads to confusion and wrong turns. The same happens if your domain doesn’t have the correct nameservers. Double-check the entries before saving. Once you’ve updated and saved the settings, give it some time. DNS propagation can take up to 48 hours. But often, it’s much quicker. Check back periodically to see if the changes have taken effect. Remember, updating DNS settings is like setting a new destination for your domain. Ensuring it’s done correctly means your website will be live and accessible to everyone. Isn’t it exciting to know you’re so close to having your website up and running?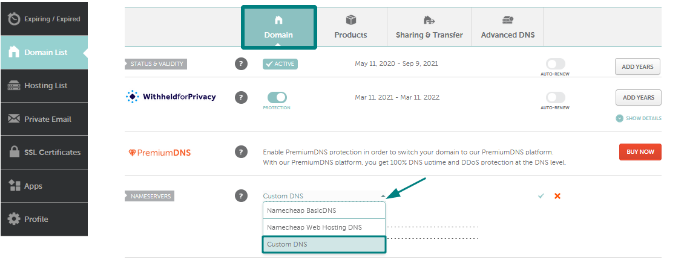
Credit: www.namecheap.com
Verifying Domain Connection
Connecting your Namecheap domain to SiteGround enhances your website’s accessibility. Update Namecheap’s DNS settings to point to SiteGround’s servers. Confirm the connection by checking the updated DNS records.
Verifying your domain connection is a crucial step after pointing your Namecheap domain to SiteGround. Once you’ve updated the DNS settings, you need to ensure everything is correctly configured. This verification process guarantees that your website will be accessible to your audience without any hiccups.Checking Dns Propagation
DNS propagation can take some time. Typically, it ranges from a few minutes to 48 hours. Patience is key during this phase. You can use online tools to check the status. Websites like “WhatsMyDNS” allow you to enter your domain and see how it’s propagating across different global servers. This is a handy way to track progress and spot potential issues. It’s fascinating to witness how your changes spread across the internet. Think of it as watching your digital footprint expand.Troubleshooting Common Issues
Sometimes, the connection doesn’t work as smoothly as planned. Don’t worry; this is quite common and fixable. First, double-check your DNS settings. Ensure you’ve entered the correct SiteGround nameservers in Namecheap. Typos can easily slip in, causing connection issues. Another common problem is cached DNS data. Clear your browser cache or use incognito mode to see the most recent version of your website. If you’re still facing issues, SiteGround’s support team is incredibly helpful. They offer 24/7 support and can guide you through resolving persistent problems. Have you ever thought about how essential support can be in these situations? By taking these steps, you can confidently verify your domain connection, ensuring your website is ready for the world.Optimizing Domain Performance
Optimizing domain performance is crucial for a seamless online experience. Connecting your Namecheap domain to SiteGround is the first step. However, enhancing your domain’s efficiency involves more than just pointing it correctly. It requires strategic measures to ensure speed, security, and reliability. Below, we’ll explore ways to maximize your domain’s potential.
Utilizing Cdn Services
CDN services improve loading times significantly. They store copies of your website across global servers. When visitors access your site, the CDN serves the content from the nearest server. This reduces latency and enhances speed. Faster loading times lead to better user experience. It also boosts your site’s search engine ranking. Choose a reliable CDN provider to ensure optimal performance.
Enhancing Security Measures
Security is vital for domain performance. Implement SSL certificates to encrypt data. This protects user information and builds trust. Monitor your site for vulnerabilities regularly. Use SiteGround’s security tools to safeguard your domain. They offer malware scanning and firewall protection. Strong security measures prevent attacks and downtime. A secure site attracts more visitors and improves credibility.

Credit: www.seeimagery.com
Frequently Asked Questions
How Do I Point A Domain To Siteground?
To point a domain to SiteGround, update your domain’s DNS settings. Use the nameservers provided by SiteGround in your hosting account. After updating, it may take up to 48 hours for changes to propagate. Ensure your domain is registered and active for successful pointing.
How Do I Forward My Domain To Siteground?
Log in to your domain registrar’s dashboard. Locate DNS settings. Update the A record to SiteGround’s IP. Save changes.
How Do I Connect My Namecheap Domain To My Website?
Log in to your Namecheap account. Go to the “Domain List” and select your domain. Click “Manage” and choose “Advanced DNS. ” Add your web host’s nameservers under “Nameservers” or create an “A Record” pointing to your website’s IP address.
Save changes and wait for DNS propagation.
How Do I Point My Domain To A Website Hosted Elsewhere?
Update DNS settings to point your domain to your website’s IP address. Access your domain registrar’s control panel, find DNS settings, and enter your hosting provider’s IP address. Save changes and allow time for DNS propagation. Your domain will then direct to your hosted website.
Conclusion
Setting up your domain with SiteGround is simple. You just need patience and accuracy. Follow each step carefully. Your website will be live and ready soon. This guide helps even if you’re new to domains. With practice, you’ll get better.
Your website’s success starts with a correct setup. Troubleshooting tips are handy. Bookmark this post for future reference. Share it with friends who might need help. Connecting Namecheap to SiteGround is straightforward. Enjoy your new website and its possibilities. Happy hosting!