
Your website’s logo is the face of your brand. Changing it might seem tricky if you’re new to WordPress, but it doesn’t have to be.
Imagine giving your site a fresh, professional look in just a few simple steps. In this guide, you’ll learn exactly how to change your logo quickly and easily—no technical skills needed. By the end, you’ll have the confidence to update your site’s identity anytime you want.
Ready to make your website stand out? Let’s dive in!
Credit: wpengine.com
Choose The Right Logo
Choosing the right logo is a key step when changing your logo in WordPress. A good logo helps visitors recognize your brand quickly. It should look clear and professional on your website. The right logo supports your brand’s message and style. Think about how it fits with your site’s colors and layout. A well-chosen logo improves the overall look and feel of your site.
Logo Size And Format
Choose a logo size that fits your website’s header or menu area. Too large logos can slow down your site. Too small logos may look blurry or unclear. Use common image formats like PNG or SVG for the best quality. PNG supports transparency, so your logo blends well with backgrounds. SVG files are scalable and stay sharp on all screen sizes. Save your logo in the correct size before uploading to WordPress.
Design Tips For Impact
Keep your logo simple and easy to recognize. Avoid too many colors or complicated shapes. Use colors that match your website’s palette. Make sure the logo works on both light and dark backgrounds. Test your logo on different devices to check clarity. A strong logo stays memorable and clear, even at small sizes. Balance creativity with simplicity for the best results.
Credit: 10web.io
Access The WordPress Dashboard
Accessing the WordPress dashboard is the first step to change your website logo. This dashboard is the control panel for your site. From here, you can manage all website settings. It is simple to reach and easy to use. Follow the steps below to access it quickly.
Login Steps
Open your web browser and go to your WordPress login page. Usually, it is your website address followed by /wp-admin. Enter your username and password carefully. Click the “Log In” button to enter the dashboard. If your details are correct, the dashboard will appear. Keep your login details safe for future use.
Navigating To Appearance
Once inside the dashboard, look at the left sidebar. Find the menu item called “Appearance.” Click on it to expand the options. Under Appearance, select “Customize” or “Themes” based on your WordPress version. These sections allow you to change your logo and other design settings. This is where you start editing your site’s look.
Locate The Logo Settings
Changing your logo in WordPress starts with finding the right settings. This step is simple but important. It helps you change the logo quickly and correctly. WordPress offers a few ways to locate these settings. Each method depends on your theme and setup.
Using The Customizer
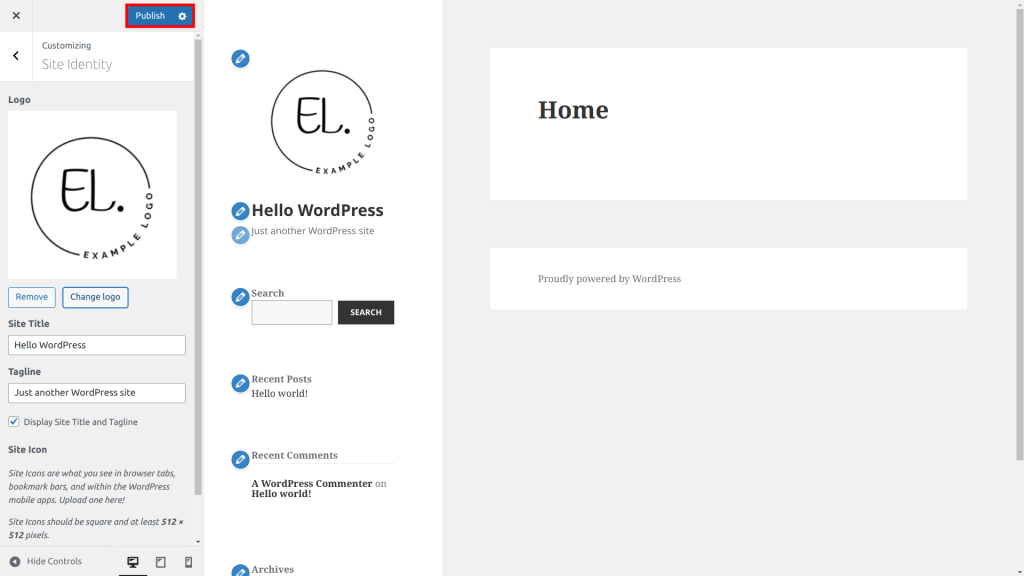
The easiest way to find logo settings is through the Customizer. Go to your WordPress dashboard. Click on “Appearance” then “Customize.” Here, look for a section named “Site Identity” or “Header.” This area usually holds the logo options. You can upload or change your logo directly here. Changes show live, so you see how your site looks instantly.
Theme-specific Options
Some themes have their own panel for logo settings. Check your dashboard for a menu with your theme’s name. Inside, you may find a “Logo” or “Header” tab. This section controls the logo and other header elements. It offers more design options than the Customizer. Always save your changes to update the logo on your site.
Credit: www.hostinger.com
Upload Your New Logo
Uploading your new logo to WordPress is a simple step that updates your site’s look. It gives your website a fresh, professional feel. This part focuses on choosing the right file and placing the logo correctly on your site.
Selecting The File
Start by choosing the logo file from your computer. The best formats are PNG or SVG for clear images. Make sure the file size is not too large to avoid slow loading times. Use a square or horizontal logo for better fit. Check the image quality before uploading.
Adjusting Logo Placement
After uploading, adjust where the logo appears on your site. Most themes let you move it to the left, center, or right. Use the preview option to see how it looks on different devices. Proper placement helps visitors recognize your brand easily. Keep some space around the logo for a clean look.
Preview And Publish Changes
After uploading your new logo, it is important to preview and publish changes carefully. This step ensures the logo looks good across your website before making it live for all visitors. Taking time to check the logo’s appearance prevents mistakes and keeps your website professional.
Checking Responsiveness
Check how your logo appears on different devices like phones, tablets, and desktops. A responsive logo fits well in all screen sizes without losing quality. Use your browser’s developer tools or resize the window to see how the logo adapts. Ensure it is clear and not too large or small on any device.
Finalizing The Update
After confirming the logo looks right on all devices, save your changes. Use the preview mode in WordPress to view the logo in the website’s full layout. If everything appears as expected, click the publish button. This action makes your new logo live for all visitors to see.
Troubleshoot Common Issues
Troubleshooting common issues helps keep your WordPress logo looking right. Problems can stop your logo from showing or make it look bad. Fixing these issues makes your site look professional and clean.
Check these common problems carefully. Small changes can make a big difference.
Logo Not Showing
Check if the logo file is uploaded correctly. Sometimes the file path is wrong. Clear your browser cache to see changes. Disable plugins that might block images. Use a supported file type like PNG or JPG. Confirm your theme settings allow logo display. Refresh your page after each fix to test.
Size And Quality Problems
Upload images with correct size and resolution. Large files slow down the site. Small files look blurry or pixelated. Use images at least 300 pixels wide. Keep aspect ratio to avoid distortion. Compress images for faster loading. Check your theme’s recommended logo size. Adjust image size before uploading for best results.
Enhance Your Brand Identity
Enhancing your brand identity through your WordPress logo is vital. Your logo is the face of your business online. It should reflect your brand’s style and values clearly. Changing your logo on WordPress is more than a design update. It helps keep your branding strong and consistent across all your pages.
Consistency Across Pages
Use the same logo size and placement on every page. This keeps your site looking professional and organized. Visitors will recognize your brand quickly. Avoid different logo versions on different pages. Consistent use builds trust and makes your site easier to navigate.
Using Logo Variations
Sometimes, a full logo may not fit well in all spaces. Create simple versions for smaller areas like mobile headers or footers. Use monochrome or icon-only logos to keep clarity. These variations keep your brand identity clear in every section. Choose versions that match your main logo style closely.
Frequently Asked Questions
How Do I Change My Logo In WordPress?
To change your logo, go to Appearance > Customize > Site Identity. Upload your new logo image and save changes. This updates the logo across your WordPress site instantly.
What Logo Size Works Best For WordPress?
A logo size of 250×100 pixels is ideal for most WordPress themes. Ensure it’s clear and optimized for fast loading to keep your site performance smooth.
Can I Upload A Transparent Logo In WordPress?
Yes, WordPress supports transparent PNG logos. Upload your logo with transparency for a clean look that fits any background on your site.
Will Changing My Logo Affect Site Speed?
Changing the logo won’t affect speed if the image is optimized. Use compressed files and appropriate dimensions to maintain fast loading times.
Conclusion
Changing a logo in WordPress is simple and quick. Just follow the steps carefully. Choose a clear and good-quality image for your logo. Upload it to your WordPress site through the theme customizer or settings. Preview the changes before saving to see how it looks.
A fresh logo helps your site look professional and unique. Keep your brand consistent by updating your logo regularly. Now, your website stands out with a new, clean logo. Easy, right?


