
Are you looking to enhance your website’s security and performance? Adding Cloudflare nameservers to your Namecheap domain might just be the solution you need.
By doing so, you unlock a world of benefits including faster load times, improved security, and better global reach. You don’t have to be a tech expert to make these changes; with a few simple steps, you can make your website more robust and efficient.
Stick around, and we’ll guide you through the process, ensuring that your site is optimized for success. Ready to take control and boost your website’s capabilities? Let’s dive in and get started!

Credit: www.youtube.com
Setting Up Cloudflare Account
Setting up a Cloudflare account is a crucial step if you want to manage your website’s DNS efficiently and leverage the benefits of enhanced security and performance. Whether you’re a seasoned webmaster or a novice, creating an account with Cloudflare is straightforward and opens up a world of possibilities for optimizing your website. Let’s walk through the process, making sure you’re equipped with practical tips and insights.
Create Your Cloudflare Account
Head over to Cloudflare’s website. Click on the ‘Sign Up’ button prominently displayed on their homepage. This is where you begin your journey to better website performance.
Input your email address, ensuring it’s one you frequently check. You’ll need it for notifications and updates. Create a strong password to protect your account.
Once you’ve filled in your details, click ‘Create Account’. You’ll receive a verification email shortly. Confirm your email to activate your account.
Add Your Website
After logging in, you’ll be prompted to add your website. Type your domain name into the field provided. Be sure to use the full domain name, including any subdomains if applicable.
Cloudflare will begin scanning your existing DNS records. This is automatic and takes just a few moments. Review the records to ensure they match your current DNS settings.
If you notice discrepancies, now is the time to address them. Accurate DNS records are crucial for seamless website functionality.
Choose A Plan
Cloudflare offers several plans ranging from free to premium options. Assess your website needs and budget before choosing. The free plan often suffices for small to medium sites.
If you’re running a large-scale site with heavy traffic, consider the paid plans for additional features. Compare the benefits and pick a plan that aligns with your goals.
Remember, you can always upgrade later as your site grows.
Configure Dns Settings
With your plan selected, move on to configuring your DNS settings. Cloudflare provides an intuitive dashboard that makes this task manageable.
Add any missing DNS records that Cloudflare didn’t scan. Double-check each entry to prevent errors that could disrupt your site.
Are you ready to enhance your website’s security and speed? Configure your settings carefully and enjoy the benefits Cloudflare offers.
Setting up Cloudflare is not only easy but crucial for modern web management. How will you leverage these tools to boost your website today?
Locating Nameservers In Cloudflare
Adding Cloudflare nameservers to Namecheap enhances your website’s performance and security. The first step involves locating your nameservers in Cloudflare. This ensures that your domain points to Cloudflare’s network, optimizing traffic handling and protection.
Cloudflare simplifies this process with a user-friendly dashboard. Follow the steps below to find your nameservers. You’ll be ready to update them in Namecheap.
Accessing Your Cloudflare Account
Log in to your Cloudflare account. Use your email and password to access it. Once logged in, the dashboard will appear. It’s where you manage your domains and settings.
Navigating To The Domain Overview
Select the domain you want to manage. You’ll see a list of your domains. Click on the desired domain to access its settings. This takes you to the overview page.
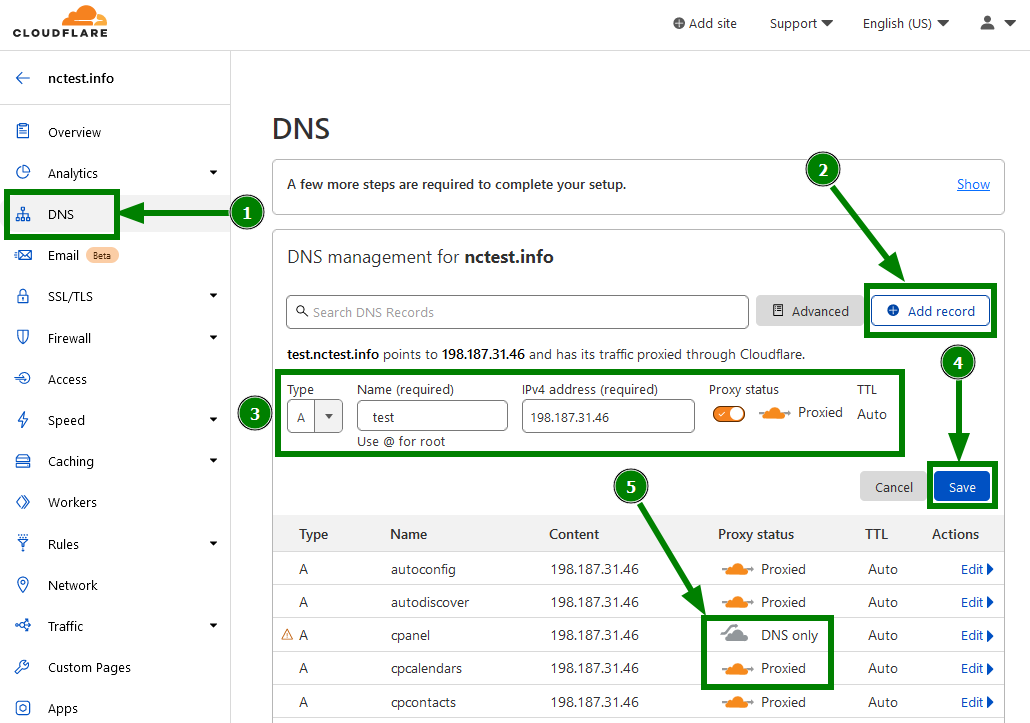
Finding The Dns Page
On the domain overview page, look for the DNS tab. Click on it to open the DNS management page. This section lists all DNS records for your domain.
Locating Your Cloudflare Nameservers
Scroll down to the Cloudflare nameservers section. Here, you’ll find two nameserver addresses. Copy these nameservers for use in Namecheap.
Ensuring Accurate Nameserver Details
Double-check the copied nameservers. Accuracy is crucial to avoid errors. Confirm that you have the correct and complete nameserver addresses.
Preparing To Update In Namecheap
With the nameservers copied, you’re ready to update them in Namecheap. This step ensures your domain uses Cloudflare’s network. Improved site performance and security are the benefits.
Updating Nameservers In Namecheap
Updating nameservers in Namecheap is a straightforward process. This step is crucial for integrating Cloudflare’s robust security and performance features. Follow these steps to ensure your domain points to Cloudflare nameservers correctly.
Access Your Domain List In Namecheap
Log in to your Namecheap account. Once logged in, navigate to the Dashboard. Here, you will see a list of your domains. Select the domain you wish to update.
Navigate To The Nameservers Section
After selecting your domain, locate the Domain tab. Click on it to find the Nameservers section. This is where you will make the necessary changes.
Choose Custom Dns
In the Nameservers section, you will see a dropdown menu. Select ‘Custom DNS’ from this menu. This option allows you to enter Cloudflare’s nameservers.
Enter Cloudflare Nameservers
Cloudflare provides two nameservers for your domain. Copy these from your Cloudflare account. Paste them into the Custom DNS fields in Namecheap. Ensure there are no extra spaces or characters.
Save Your Changes
Double-check the nameservers you entered. Then, click the green checkmark or Save button. This action saves your changes. The update might take up to 48 hours to propagate globally.

Credit: community.cloudflare.com
Credit: www.namecheap.com
Frequently Asked Questions
How Do I Add Nameservers To Namecheap?
Log into your Namecheap account. Go to “Domain List” and select your domain. Click “Manage,” then “Advanced DNS. ” Under “Nameservers,” choose “Custom DNS” and enter your nameservers. Save changes.
How To Set Up Dns Records For Namecheap Email Service With Cloudflare?
Log into Cloudflare, navigate to DNS settings, and add MX, CNAME, and TXT records provided by Namecheap. Ensure MX records point to Namecheap’s mail servers, CNAME records verify domain, and TXT records authenticate email. Save changes and propagate DNS settings.
Is Cloudflare Dns Better Than Namecheap Dns?
Cloudflare DNS offers faster performance and security features, while Namecheap DNS provides reliable domain management. Choose based on your needs.
How To Add Cloudflare Dns?
To add Cloudflare DNS, sign up at Cloudflare’s website. Then, add your domain and follow the setup instructions. Change your domain’s nameservers to Cloudflare’s provided ones in your registrar. Wait for DNS propagation to complete. Your domain is now using Cloudflare DNS.
Conclusion
Adding Cloudflare nameservers to Namecheap is a straightforward process. It enhances your site’s security and performance. Just a few clicks and your site is better protected. Start by accessing your Namecheap account. Then, update your DNS settings. Enter the nameservers provided by Cloudflare.
Save your changes. Wait a few hours for propagation. That’s it! Your site is now more secure and faster. Remember, regular updates are crucial for online security. Always keep your settings optimized. Enjoy a safer browsing experience with Cloudflare and Namecheap working together.
