Imagine a world where your emails are seamlessly integrated with your phone, accessible with just a tap. You no longer have to juggle between apps or miss important messages.
That’s the reality you can enjoy when you add your Namecheap email to your iPhone. It’s simpler than you think, and you don’t need to be a tech wizard to make it happen. We know that efficiency and ease are key for your daily communication.
That’s why we’ve crafted this step-by-step guide to help you connect your Namecheap email to your iPhone effortlessly. Unlock the full potential of your iPhone with this easy setup. Curious? Read on to discover how you can streamline your email experience today.

Credit: www.youtube.com
Setting Up Namecheap Email On Iphone
Easily add Namecheap email to your iPhone by accessing the Mail app. Enter your email details and adjust settings. Quickly start sending and receiving emails on your device.
Setting up your Namecheap email on an iPhone doesn’t have to be a daunting task. In fact, it can be a straightforward process that ensures you stay connected on the go. Imagine having all your emails accessible at your fingertips, without the hassle of switching between apps or devices. With just a few simple steps, you can make this a reality and streamline your communication. Let’s dive into the process and make sure you’re up and running without a hitch.Understanding Your Email Settings
Before you begin, ensure you have your Namecheap email settings handy. These include your email address, password, incoming and outgoing server details. Without these, you might find yourself staring at your phone screen in confusion.Accessing Your Iphone’s Mail Settings
Head to your iPhone’s settings. Scroll until you find ‘Mail’ and tap to open it. This is where the magic happens, and you start integrating your Namecheap email into your device.Adding A New Account
Once inside the Mail settings, select ‘Accounts’. Here, you’ll see an option to ‘Add Account’. Tap it and choose ‘Other’ since Namecheap isn’t listed among the default options.Entering Your Namecheap Email Details
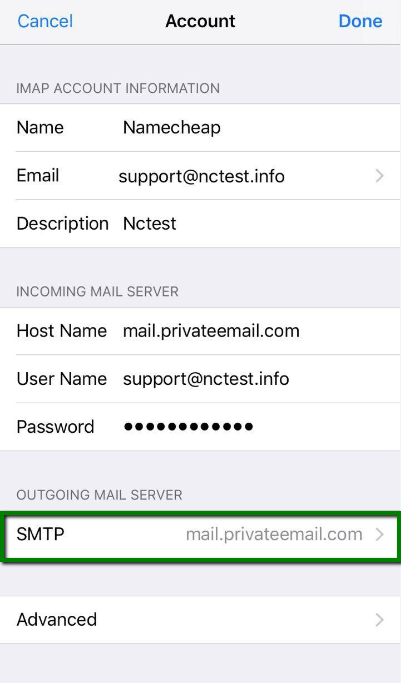
Fill in your Namecheap email address and password. When prompted, enter the server details: IMAP or POP for incoming, SMTP for outgoing. This is crucial to ensure your emails sync correctly.Verifying And Saving Your Account
After entering the details, your iPhone will attempt to verify the information. If all goes well, you’ll see a confirmation. Hit ‘Save’ and breathe a sigh of relief as your Namecheap email is now set up. Sometimes things don’t go as planned. If verification fails, check for typos or incorrect server settings. Re-enter the information and try again. Persistence is key. Setting up email can seem tedious, but imagine the convenience of checking emails during a coffee break or while waiting in line. Wouldn’t it be nice if you could do all this effortlessly? Dive into this setup, and enjoy seamless communication wherever you are.
Credit: www.youtube.com
Troubleshooting Common Issues
Easily add your Namecheap email to your iPhone with these simple steps. First, navigate to the settings on your iPhone. Then, follow the prompts to input your email details.
Adding your Namecheap email to your iPhone can be a breeze, but sometimes things don’t go as smoothly as planned. It’s like setting up a new gadget – exciting yet occasionally tricky. You might encounter a few bumps along the way, but don’t worry. You’re not alone in this. Let’s tackle some common issues and make sure your email is up and running without a hitch. ###Incorrect Password Or Username
One of the most frequent hiccups is entering the wrong username or password. Double-check your details. Is the ‘Caps Lock’ key accidentally on? Ensure your email address is spelled correctly and your password matches exactly what you set up on Namecheap. ###Server Settings Errors
Another common issue arises from server settings. Make sure you’ve entered the correct incoming and outgoing server details. For Namecheap, typically it’s something like `mail.yourdomain.com`. If you’re unsure, consult Namecheap’s support page for precise information. ###Ssl And Port Number Conflicts
SSL settings can sometimes be a puzzle. Ensure you have the correct SSL settings enabled. Port numbers should also match the recommended settings by Namecheap. For instance, the IMAP port is usually 993 with SSL, and SMTP is 465. ###Network Connectivity Problems
Check if your iPhone is connected to Wi-Fi or mobile data. Email setup relies on an active internet connection. Try switching to a different network if you’re having trouble. Have you tried toggling your Wi-Fi off and on? ###Outdated Ios Version
Your iOS version might need an update. Sometimes, outdated software can cause compatibility issues. Head over to your settings and check if there’s a new update available. Keeping your iPhone up-to-date can solve a lot of mysterious problems. ###Contacting Namecheap Support
If none of the above fixes work, don’t hesitate to reach out to Namecheap support. They can provide specific solutions tailored to your account. Have you ever thought about how quick help can resolve hours of frustration? Sometimes, a direct line to support is your best bet. Troubleshooting these common issues can feel like a mini adventure. Each step brings you closer to seamless email connectivity. What other tech challenges have you conquered lately? Remember, persistence is key, and soon enough, your Namecheap email will be buzzing with updates on your iPhone!Tips For Seamless Email Experience
Setting up your Namecheap email on your iPhone ensures efficient communication. A seamless email experience can boost productivity. Let’s explore some tips to enhance your email setup.
Optimize Email Sync Settings
Email sync settings can affect how quickly emails appear. Adjust these settings for faster updates. Choose the option that fits your needs best. Frequent syncing can keep you updated.
Enable Push Notifications
Push notifications alert you to new emails instantly. Enable them for timely updates. Customize alerts to avoid unnecessary distractions. Stay informed without constantly checking your inbox.
Organize With Folders And Labels
Folders and labels help keep emails sorted. Create categories for different types of emails. This makes accessing important messages easier. Spend less time searching for specific emails.
Use Strong Passwords
Protect your email with a strong password. Include numbers, symbols, and letters. Avoid common words or simple sequences. A secure account keeps your information safe.
Regularly Update Apps
Updates improve app performance and security. Check for updates regularly. New features can enhance your email experience. Ensure your email app is up to date.
Manage Storage Wisely
Storage limits can affect email functionality. Delete unnecessary emails to free space. Archive old messages instead of deleting if needed. Efficient storage management keeps your email running smoothly.

Credit: www.namecheap.com
Frequently Asked Questions
How Do I Add My Namecheap Email To My Iphone?
Open Settings on your iPhone. Tap “Mail,” then “Accounts. ” Select “Add Account” and choose “Other. ” Enter your Namecheap email details. Save and verify your email account.
Is Namecheap Email Pop Or Imap?
Namecheap email supports both POP and IMAP protocols. IMAP is recommended for syncing across multiple devices. POP is suitable for downloading emails to a single device. Choose based on your email access preference.
How Do I Add My Domain Email To My Iphone?
To add your domain email to an iPhone, go to Settings, select “Mail,” tap “Accounts,” and choose “Add Account. ” Select “Other,” then “Add Mail Account,” and enter your domain email details. Ensure server settings are correct, then save. Your domain email should now be accessible on your iPhone.
How Do I Add My Company Email To My Iphone?
Open “Settings” on your iPhone. Tap “Mail” and select “Accounts. ” Choose “Add Account” and select your email provider. Enter your company email and password. Follow the on-screen instructions to complete the setup. Your company email will sync with your iPhone.
Conclusion
Setting up Namecheap email on your iPhone is simple. Follow these steps, and you’ll be connected. First, ensure you have your email settings ready. Then, input the details into your iPhone’s mail app. Check for any errors in your entries.
Make sure to save the settings. Test your email by sending a message. If it works, you’re all set! Troubleshooting helps if issues arise. Keep your email settings handy for future reference. Now, enjoy seamless communication on your iPhone. Stay connected with ease and efficiency.
