
Are you looking to expand your online presence without the hassle of setting up a whole new domain? Adding a subdomain to your existing Namecheap domain could be the perfect solution.
Whether you’re launching a blog, creating a portfolio, or setting up a separate landing page for a specific campaign, subdomains offer a flexible way to manage your content under a single web address. By the end of this article, you’ll know exactly how to add a subdomain in Namecheap, making it easier to organize your web resources and boost your site’s functionality.
Imagine the possibilities: more targeted traffic, better user experience, and a streamlined process—all with just a few clicks. Stick around, and let’s make your online goals a reality with Namecheap’s easy-to-use tools.
Credit: help.mailgun.com
Setting Up Your Namecheap Account
Setting up your Namecheap account is the first step to creating a subdomain. Namecheap is user-friendly and offers various features for domain management. You need a Namecheap account to manage your domain settings effectively.
Creating A Namecheap Account
Visit Namecheap’s website and click on “Sign Up”. Fill in your personal details. Choose a strong password. Verify your email address to complete registration.
Accessing Your Account Dashboard
Log in to your Namecheap account using your credentials. Once inside, you’ll see the dashboard. This is where you manage domains, subdomains, and other settings.
Locating Domain List
Click on “Domain List” in the left menu. This displays all domains you own. Find the domain where you want to add a subdomain.
Understanding Domain Settings
Next, click on “Manage” beside your chosen domain. This opens domain settings. Here, you can adjust various domain-related configurations.

Credit: thomasgauvin.com
Navigating To Domain Management
Adding a subdomain in Namecheap requires precise navigation. Knowing how to reach the right section is crucial. This guide will walk you through accessing Domain Management. Follow these steps to simplify the process.
Access Your Namecheap Account
First, log in to your Namecheap account. Use your registered email and password. Ensure you have a stable internet connection. This prevents any disruptions during the process.
Locate The Dashboard
After logging in, find the Dashboard. It displays all your domain names. The Dashboard is user-friendly. You can easily spot your domain list.
Select Your Domain
Choose the domain for the subdomain. Click on the domain name. This will take you to the domain settings. Ensure you select the correct domain to avoid errors.
Open Domain Management
In the domain settings, find the Domain Management section. It is usually labeled clearly. Click on it to proceed. This section allows you to manage your DNS settings.
Navigating To The Advanced Dns Tab
Once in Domain Management, locate the Advanced DNS tab. Click to open it. This is where you will add your subdomain. Familiarize yourself with this section for future tasks.
By following these steps, you’ll efficiently navigate Namecheap’s Domain Management. This ensures a smoother process in setting up your subdomain.
Creating A Subdomain
Adding a subdomain in Namecheap involves accessing the domain list and selecting the ‘Manage’ button. Locate the ‘Advanced DNS’ tab, and click ‘Add New Record’ to set up your subdomain. Make sure to fill in the required fields accurately for proper configuration.
Creating a subdomain can seem like a daunting task if you’re new to managing websites. However, with Namecheap, the process is straightforward and user-friendly. Whether you want to create a blog, a shop, or a forum attached to your main domain, adding a subdomain can be a strategic move to enhance your online presence. Think about it. Isn’t it exciting to expand your website’s functionality? Let’s dive into how you can achieve this with Namecheap. ###Step 1: Access Your Namecheap Account
Start by logging into your Namecheap account. Once you’re in, head over to the Dashboard. The Dashboard is your central hub where you can manage your domains. Have you ever noticed how easy it is to navigate? It’s designed to make your experience smooth. ###Step 2: Choose Your Domain
Look for the Domain List section. This is where all your registered domains are displayed. Select the domain you want to add a subdomain to. Click on the Manage button next to it. Isn’t it satisfying to see all your domains in one organized list? ###Step 3: Navigate To The Advanced Dns Tab
Once you’re on the domain management page, find the Advanced DNS tab. This tab allows you to manage DNS settings. You might wonder why DNS settings matter. It’s because they define how your domain connects to the web. Without the right settings, your subdomain won’t function correctly. ###Step 4: Add A New Record
Now, you’ll need to add a new record. Scroll down to the Host Records section. Click on the Add New Record button. Choose CNAME Record from the dropdown menu. This type of record is ideal for pointing your subdomain to another web address. ###Step 5: Fill In The Details
In the Host field, enter the name of your subdomain. For example, if you want your subdomain to be “blog.yourdomain.com”, simply type “blog”. In the Value field, enter the destination URL. This is where your subdomain will point to. Set the TTL to Automatic to ensure optimal speed. ###Step 6: Save Your Changes
Don’t forget to save your changes! After entering all the details, click on the Save All Changes button. It’s rewarding to see your efforts come together. You’ve just successfully added a subdomain to your Namecheap domain! Now, give it a moment. DNS changes can take some time to propagate. Are you excited to see your subdomain live? Creating subdomains is a fantastic way to diversify your site’s offerings. What new possibilities will your subdomain unlock for you?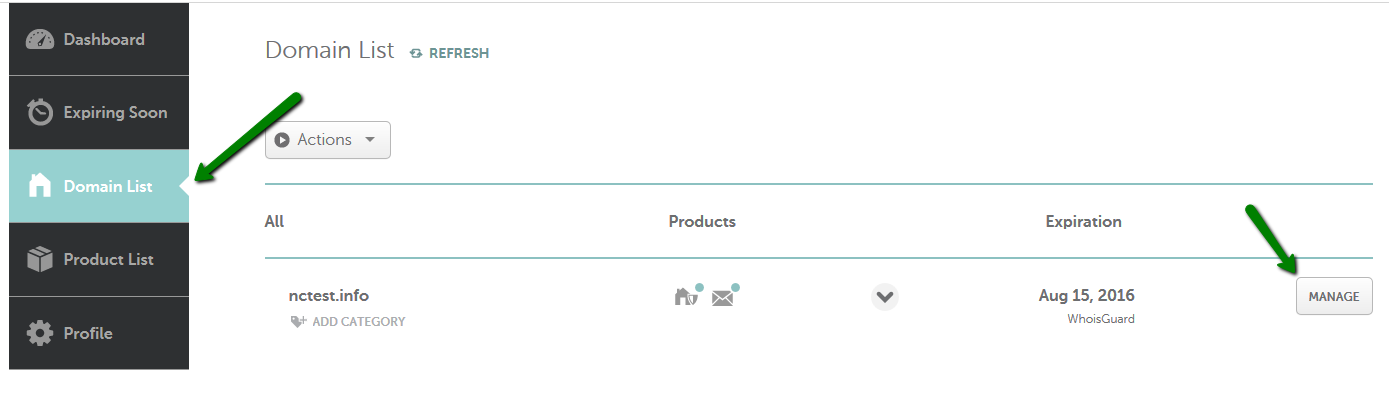
Credit: www.namecheap.com
Frequently Asked Questions
How Do I Add A Sub Domain On Namecheap?
Log into your Namecheap account. Go to the “Domain List” and select “Manage” next to your domain. Click on “Advanced DNS. ” Under “Host Records,” click “Add New Record,” choose “CNAME Record,” and input your subdomain details. Save changes to complete.
How Do I Add A Sub Domain?
Log into your domain registrar account. Go to DNS settings. Add a new record for the subdomain. Specify the subdomain name and target server. Save the changes.
How Do I Add A Domain In Namecheap?
Log in to your Namecheap account. Go to the “Domain List” section. Click “Add Domain” and follow the prompts. Enter your domain name, and complete the setup.
What Is Add On Domain Vs Sub Domain?
An add-on domain is a unique domain that hosts a separate website on your existing hosting account. A subdomain is a subdivision of your main domain, often used for organizing content or separate sections. Both serve different purposes in website management and SEO strategies.
Conclusion
Adding a subdomain in Namecheap is simple and straightforward. You follow the steps outlined, and your subdomain appears online. This enhances your website’s structure and accessibility. Remember to check settings and verify details for smooth operation. Troubleshooting tips can help resolve common issues.
Practice makes perfect, so don’t hesitate to explore more options. With this skill, you expand your web presence effectively. Start small and build confidence over time. Keep learning and adapting to new tools. Creating a subdomain is just the beginning of your web journey.
Keep exploring and growing your digital space!
