
Are you ready to take control of your website’s domain settings? Adding nameservers to your Namecheap account is a simple yet crucial step in managing your online presence.
Whether you’re launching a new website or making updates to an existing one, knowing how to configure nameservers can save you time and enhance your site’s performance. Imagine the peace of mind you’ll gain when your domain is properly connected to your hosting service, ensuring seamless access for your visitors.
In this guide, you’ll discover straightforward instructions to effortlessly add nameservers in Namecheap. Dive in to empower yourself with the knowledge to optimize your website’s functionality and reliability. Your domain’s success begins here!
Credit: kinsta.com
Accessing Your Namecheap Account
Easily manage your Namecheap account by adding nameservers. Log in, navigate to “Domain List,” and select your domain. Click “Manage,” then “Nameservers,” and choose “Custom DNS. ” Enter your desired nameservers and save changes. This process allows seamless domain management and improved website performance.
Accessing your Namecheap account is the first step towards managing your domain effectively. Whether you’re a seasoned webmaster or a newcomer, navigating through Namecheap’s interface is crucial to making changes, like adding a nameserver. You may find this process simple, yet empowering, as it gives you control over your online presence. ###Logging Into Your Namecheap Account
Start by visiting the Namecheap homepage. Look for the “Sign In” button prominently displayed at the top-right corner. Enter your username and password. If you’ve forgotten your credentials, don’t worry—just click on “Forgot Password?” and follow the recovery steps. Once logged in, you’ll find yourself in the dashboard, your central hub for domain management. Have you ever noticed how organized it feels? This is where you can access all your domains and make the necessary changes. ###Navigating To Domain List
From your dashboard, locate the “Domain List” tab on the left side. Clicking it will present you with all the domains you own. This is your domain library. Each entry shows the domain name, expiration date, and your current nameservers. Isn’t it fascinating to have all your domains neatly listed? Identify the domain you want to modify. You may have a single domain or a dozen. How does it feel to see them all under your control? ###Preparing To Add Nameserver
Select the domain you wish to update. Clicking on it will reveal several options, including “Manage.” Here, you’re just a few clicks away from adding a nameserver. Imagine the power at your fingertips—changing how your domain interacts with the web. Take a moment to review your current nameserver settings. Are they aligned with your goals? If not, you’re ready to make a change. ###Making Changes With Confidence
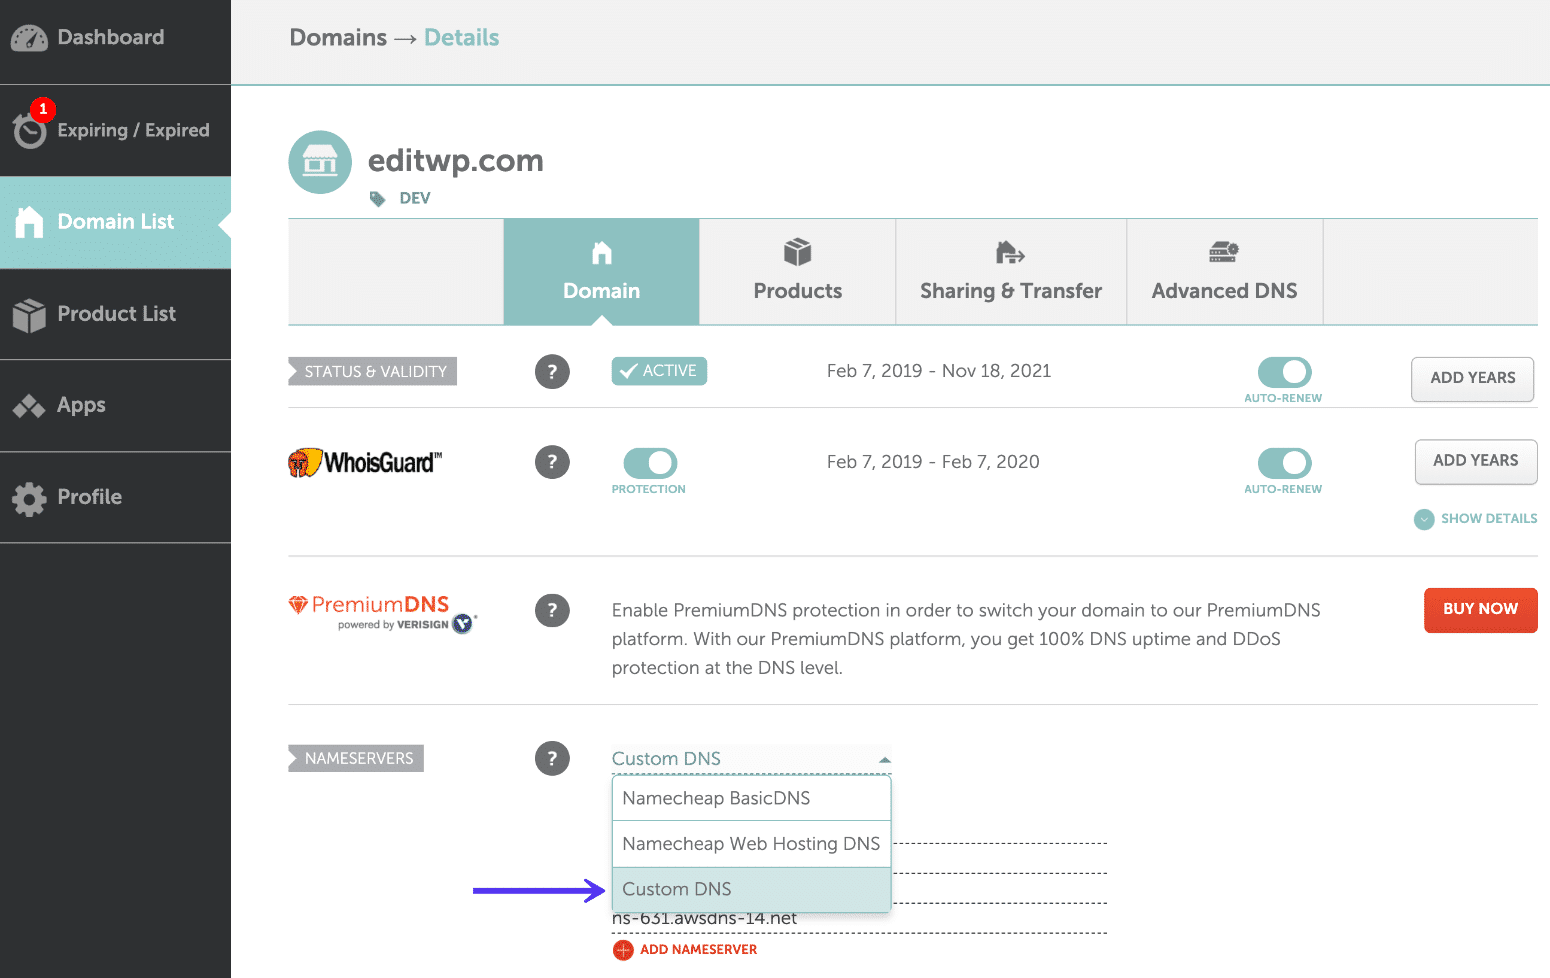
Click on the “Nameservers” section. You’ll see a drop-down menu with options like “Namecheap BasicDNS” or “Custom DNS.” Choosing “Custom DNS” allows you to input new nameservers. How exciting is it to customize your domain settings? Enter the new nameserver addresses. Double-check for accuracy. You wouldn’t want a typo to disrupt your site’s functionality, right? ###Saving Your Changes
After entering the new nameservers, click “Save.” Your changes may take time to propagate, so be patient. Have you ever wondered how these changes ripple across the digital landscape? Congratulations! You’ve successfully added a nameserver. Reflect on this achievement—how does it feel to manage your domain like a pro? Accessing and managing your Namecheap account isn’t just about technical tasks; it’s about empowerment and control over your digital identity. Ready to explore more?Locating Domain Settings
Locating the domain settings in Namecheap is crucial for adding nameservers. This step ensures your domain points to the correct server. Understanding where to find these settings can save time and reduce confusion.
Once you’re logged into your Namecheap account, follow these simple steps. Navigate through the dashboard to locate your domain settings easily.
Accessing Your Account Dashboard
Log in to your Namecheap account. After logging in, you will land on the dashboard. This is your account’s control center. Here, you can manage all your domains.
Finding The Domain List
On the left side of the dashboard, find the “Domain List” tab. This tab holds all domains you own. Click it to see the complete list.
Selecting The Right Domain
Scroll through the domain list. Locate the domain you want to modify. Click on “Manage” next to your chosen domain.
Navigating To Domain Settings
Once in the domain management section, look for the “Domain Settings” tab. This tab contains all the necessary options for your domain. Here, you can add, edit, or remove nameservers.
Configuring Nameservers
Setting up nameservers is crucial for your website. They connect your domain to the server hosting your site. Without proper configuration, your site won’t be accessible. Namecheap makes this process straightforward. This guide will walk you through it.
Choosing The Right Nameservers
First, decide which nameservers to use. Namecheap offers default nameservers. Or, you can opt for custom ones. Using the right nameservers affects your site’s performance. Choose carefully.
Accessing Your Domain Settings
Log into your Namecheap account. Navigate to the ‘Domain List’ section. Find the domain you want to modify. Click on ‘Manage’ next to the domain name. This opens the domain settings page.
Locating The Nameserver Section
In the domain settings, find the ‘Nameservers’ section. It is usually in the ‘Domain’ tab. Here, you can view current nameservers. You can also update them.
Entering Custom Nameservers
Select ‘Custom DNS’ from the dropdown menu. Enter your custom nameservers in the provided fields. Ensure each nameserver is correct. Incorrect entries can lead to downtime.
Saving Your Changes
Once you enter the nameservers, click ‘Save’. This action updates your domain settings. Changes might take time to reflect. Usually, it takes up to 48 hours.
Verifying Nameserver Changes
After saving, check if the nameservers are active. Use online tools for verification. Ensure your site is accessible. If not, recheck your entries for errors.
Understanding Propagation Time
Nameserver changes involve propagation. This process takes time. Your site may not be immediately accessible. Be patient, as it can take up to 48 hours.
Credit: www.namecheap.com

Credit: www.youtube.com
Frequently Asked Questions
How Do I Add A Nameserver In Namecheap?
Log into your Namecheap account. Navigate to the “Domain List” section. Select your domain and click “Manage. ” Under the “Nameservers” section, choose “Custom DNS. ” Enter your desired nameservers and click “Save. “
How To Set Up Private Nameservers On Namecheap?
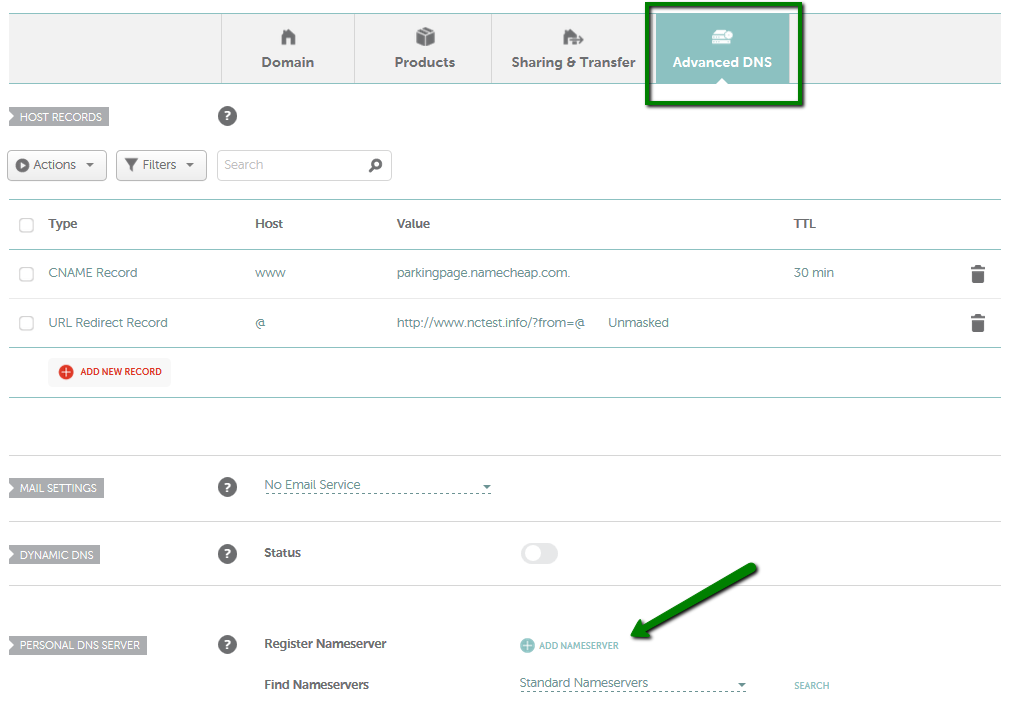
Log into Namecheap account. Go to “Domain List” and select your domain. Click “Manage”. Under “Advanced DNS”, add “Personal DNS Servers”. Enter IP addresses for your private nameservers. Save changes.
How Do I Add A Dns Nameserver?
Access your domain registrar’s dashboard. Navigate to the DNS settings. Enter the new nameserver information. Save changes and wait for propagation.
How Do I Find My Namecheap Nameservers?
Log in to your Namecheap account. Go to Domain List, click ‘Manage’ next to your domain. Find nameservers under the ‘Domain’ tab.
Conclusion
Adding nameservers in Namecheap is simple and essential. Follow the steps for a smooth process. Accurate nameserver settings ensure your domain works well. Always double-check your entries for errors. Mistakes can cause website issues. Need help? Namecheap support is available for guidance.
Remember, patience is key. Changes might take time to update. Practice makes perfect. The more you do, the easier it gets. Keep learning and exploring. Your domain management skills will grow. Stay updated with Namecheap features. This helps in managing domains efficiently.
Happy managing!


