
Imagine having complete control over your website’s domain settings, allowing you to optimize its performance and reliability. This is where understanding how to add custom nameservers in Namecheap can transform your online presence.
As a website owner, you know the importance of a smooth-running site, and nameservers play a crucial role in directing traffic effectively. By mastering this simple yet powerful skill, you can enhance your site’s speed, security, and overall functionality. You might be wondering why this matters and how exactly you can achieve it.
The good news is that the process is straightforward, even if you’re not a tech expert. Whether you’re aiming to boost your site’s loading speed or fortify its security, adding custom nameservers is your gateway to a better-managed domain. This guide will walk you through each step, empowering you with the knowledge to make your site perform at its best. So, let’s dive in and unlock the potential of your domain settings together!

Credit: www.youtube.com
Account Access
Accessing your Namecheap account is the first crucial step in adding custom nameservers. It’s like opening the door to a world where you can manage your domain’s settings with ease. Whether you’re a business owner or a blogger, your Namecheap account is your gateway to control and customization.
Login To Your Namecheap Account
Start by logging into your Namecheap account. Use your credentials—email and password—to access your dashboard. It’s a straightforward process, but make sure your details are correct to avoid any hiccups.
Navigate To The Domain List
Once inside, head over to the domain list. This section will show you all the domains you currently manage. It’s like your personal control center, where each domain is a button waiting to be pressed.
Select Your Domain
Identify the domain for which you want to add custom nameservers. Click on it to proceed to the domain settings. Ever wondered how many settings can affect your domain’s performance? This is your chance to explore.
Manage Domain Settings
In the domain settings, you’ll find the option to manage your nameservers. This is where the magic happens. Custom nameservers can enhance your domain’s reliability and speed. Are you ready to make that change?
Adding custom nameservers is not just a technical tweak; it’s a strategic move. When I first added custom nameservers, it felt empowering to have greater control over my domain. The process was simpler than I expected, yet the impact on my website’s performance was significant.
Think about the benefits custom nameservers can bring. Improved website speed and reliability are just the beginning. Isn’t it worth the effort to make your site stand out in the crowded digital space?
Remember, understanding account access is the foundation. It’s about making informed choices that align with your goals. So, take a moment to consider how you want to shape your domain’s future. What changes will you make today to enhance your online presence?
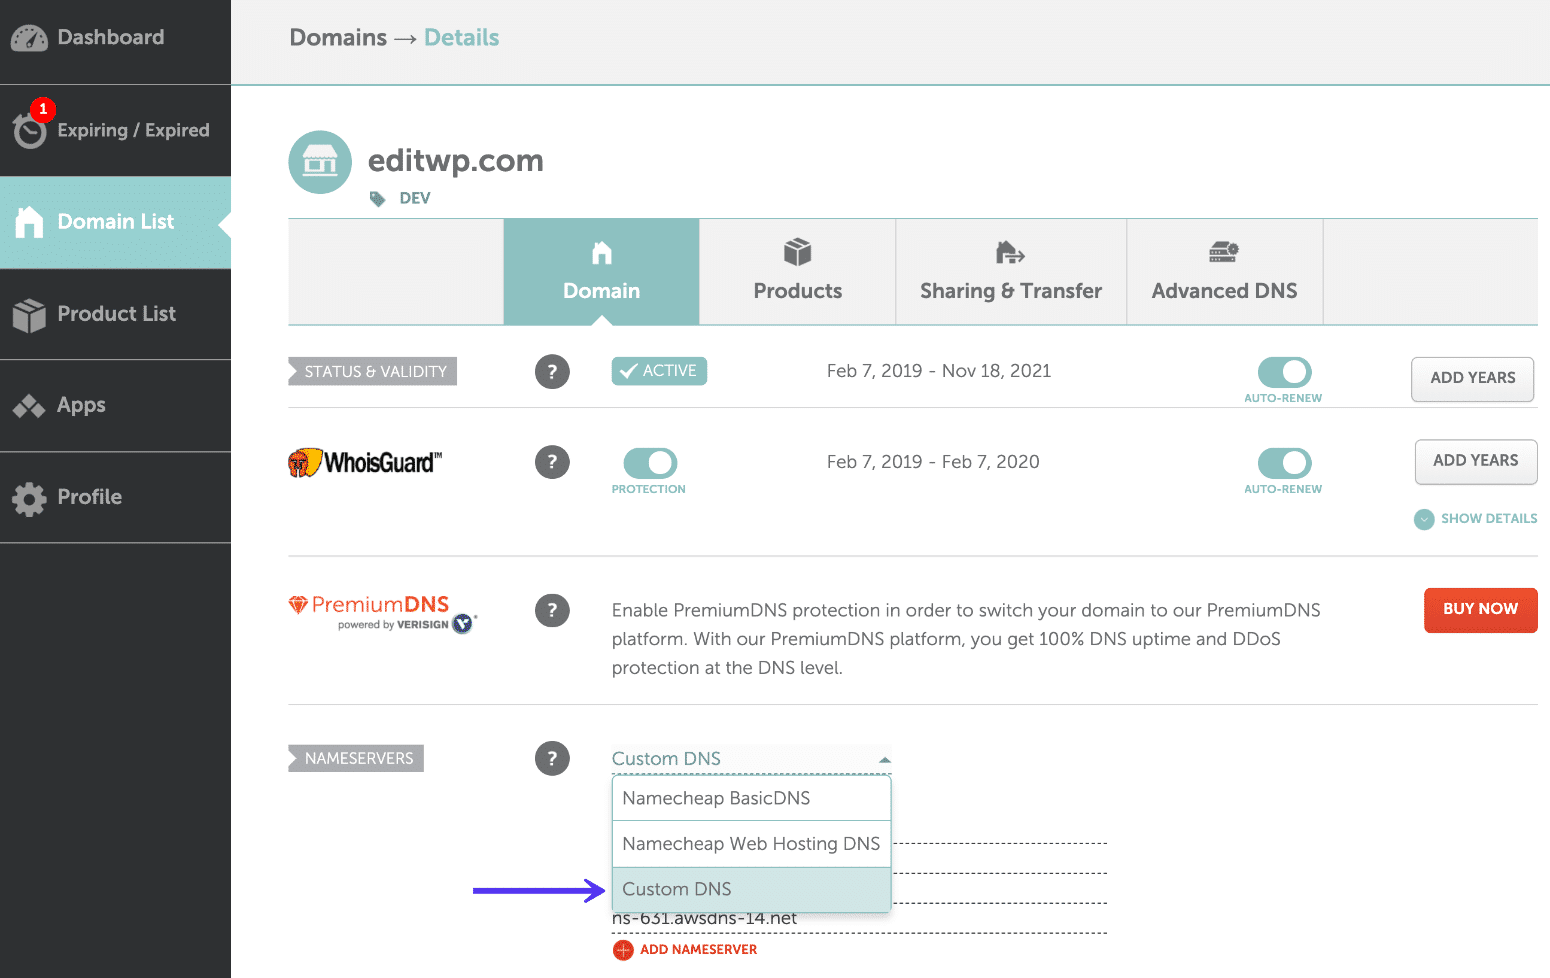
Nameserver Settings
Nameserver settings play a crucial role in managing your domain. They tell the internet where to find your website. With Namecheap, setting custom nameservers is straightforward. Follow these steps for a smooth process.
Access Your Namecheap Account
Log into your Namecheap account. Look for the “Domain List” on the dashboard. This is where your domains are listed.
Select The Domain To Modify
Click on the domain name you wish to change. This takes you to the domain management page. Here you can adjust settings.
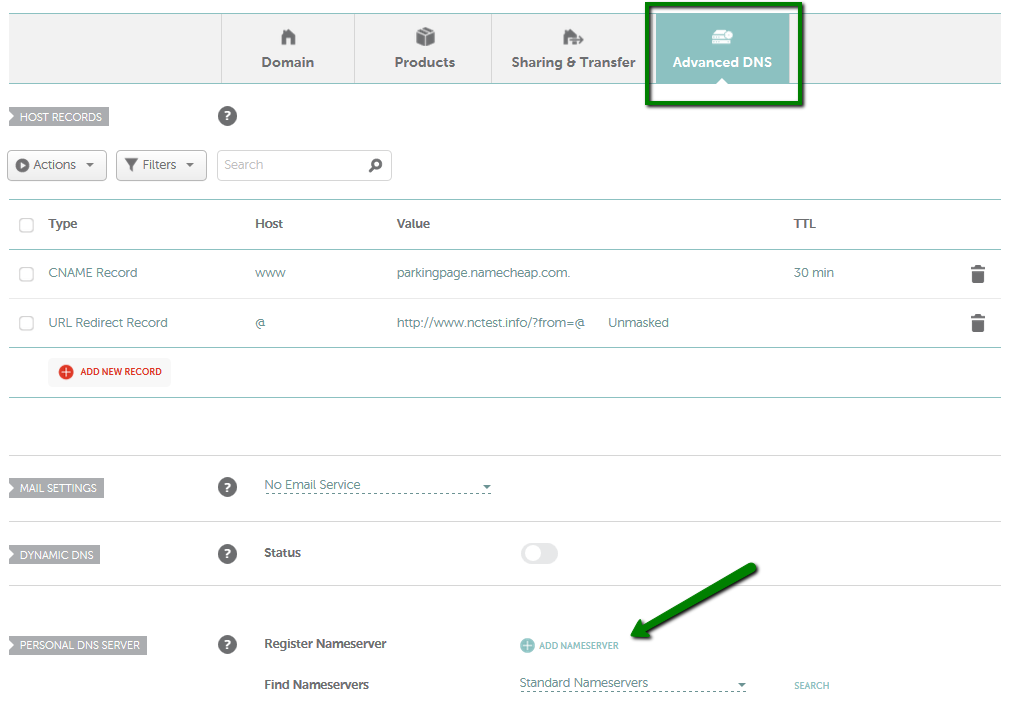
Navigate To Domain Settings
On the domain management page, find the “Nameservers” section. It’s usually under the “Domain” tab.
Choose Custom Dns
Select the “Custom DNS” option. This allows you to enter your own nameservers.
Enter Your Custom Nameservers
Enter your custom nameservers in the provided fields. Usually, you will need at least two nameservers. Double-check the information you entered.
Save Changes
After entering the nameservers, click “Save” or “Apply” to confirm. Your changes may take some time to update. Patience is key here.
Verify Your Settings
Once updated, verify the settings. Ensure your website is accessible with the new nameservers. Troubleshoot if necessary.
These steps ensure your custom nameservers are set correctly. Proper settings keep your website running smoothly.
Testing Changes
After setting up custom nameservers in Namecheap, testing is crucial. This step ensures everything functions correctly. Testing verifies that DNS settings are pointing to the right server. Successful tests confirm your site loads as expected. It prevents potential downtime or misconfigurations. Let’s dive into how to effectively test these changes.
Check Dns Propagation
DNS changes take time to propagate globally. Use online tools like DNS Checker. These tools show if your nameservers are updated worldwide. Enter your domain to see the current status. This process might take up to 48 hours.
Inspect Website Functionality
Visit your website using a web browser. Ensure the site loads without errors. Check if all pages and features work properly. Broken links or missing elements indicate DNS issues. Troubleshoot any errors immediately.
Verify Email Services
Custom nameservers may affect email services. Send test emails to and from your domain. Ensure emails are sent and received correctly. Check spam or junk folders for missing emails. Adjust DNS records if email issues arise.
Use Command Line Tools
Command line tools help test DNS settings. Use commands like nslookup or dig. These commands show detailed DNS information. They confirm nameserver settings are correct. Accessible from any computer terminal.
Monitor Website Performance
Monitor website performance post-changes. Use services like Google Analytics or Pingdom. Check for changes in site speed or uptime. Consistent performance indicates successful DNS updates. Address any performance dips swiftly.
Credit: kinsta.com
Credit: www.namecheap.com
Frequently Asked Questions
How Do I Add A Nameserver In Namecheap?
Log in to your Namecheap account. Go to “Domain List” and click “Manage” next to your domain. Select “Advanced DNS” and scroll to “Nameservers. ” Choose “Custom DNS,” enter your desired nameservers, then click the checkmark to save.
How Do I Setup A Custom Nameserver?
Access your domain registrar account. Locate the DNS settings section. Add your custom nameserver details. Save changes and wait for propagation.
How To Set Up Private Nameservers On Namecheap?
Log in to Namecheap, go to “Domain List,” then click “Manage. ” Select “Advanced DNS,” add your private nameservers under “Personal DNS Server” section, and save changes.
How To Edit Dns Zone Namecheap?
Log in to your Namecheap account. Navigate to “Domain List. ” Click “Manage” next to your domain. Select the “Advanced DNS” tab. Edit your DNS records as needed. Save changes.
Conclusion
Adding custom nameservers in Namecheap is simple with this guide. Each step is clear and easy to follow. Your domain will point to the right server. This ensures better control over your website. Remember to double-check your entries. Mistakes can cause issues with your site.
Custom nameservers can enhance your site’s performance. Stay informed and make changes as needed. Knowledge is key. Keep exploring and learning about domain settings. With practice, you will manage your domain with confidence. Enjoy the newfound control over your online presence.
