
Are you struggling to manage your website’s DNS settings on Namecheap? You’re not alone.
Changing DNS records can be a daunting task, especially if you’re not familiar with the process. But don’t worry, we’ve got you covered. Imagine having the power to control where your website lives on the internet, ensuring it runs smoothly and efficiently.
With the right guidance, you can easily update your DNS records and take charge of your online presence. In this guide, we’ll walk you through each step, making it simple and stress-free. Ready to take control and enhance your website’s performance? Let’s dive into the world of DNS records on Namecheap and unlock the potential of your online domain.
Accessing Your Namecheap Account
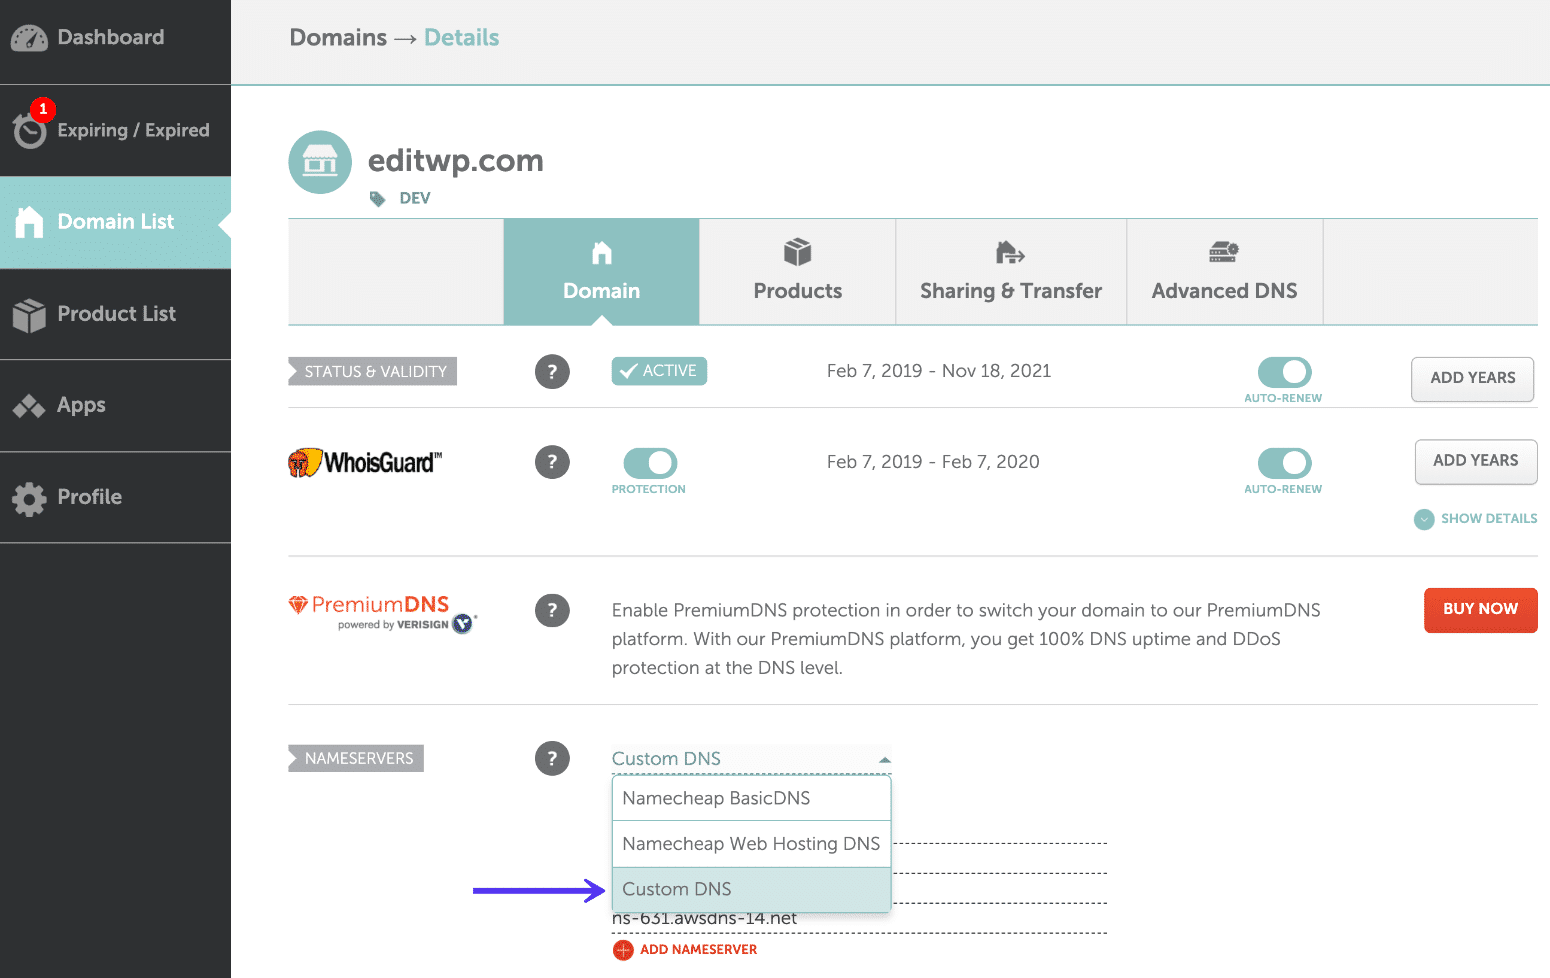
Easily manage DNS records in your Namecheap account by logging in and navigating to the Domain List. Select your domain, click on ‘Manage,’ and find the ‘Advanced DNS’ tab. Here, you can modify your DNS settings as needed.
Accessing your Namecheap account is the first step in managing your DNS records effectively. Namecheap provides a user-friendly interface, making it easy even for beginners to navigate. You’ll find that once you’re familiar with the dashboard, changing DNS records becomes a straightforward task. Start by visiting the Namecheap website and click on the “Sign In” button located at the top right corner. Enter your username and password to log into your account. Is your password unique enough to keep your account secure? It’s crucial to use a strong password that combines letters, numbers, and special characters. Once logged in, you’ll be directed to the dashboard. This is your control center where you can manage all of your domains.Locating Your Domain
On the dashboard, you’ll see a list of domains you own. If you have multiple domains, you can use the search bar to find the specific domain whose DNS records you want to change. Imagine the dashboard as a digital filing cabinet—organized and efficient. Your domain is just a click away.Navigating To Dns Settings
Click on the domain name to access its settings. Here, you’ll find a variety of options related to your domain, including DNS settings. Why not take a moment to explore other settings? Familiarizing yourself with these options can be surprisingly empowering.Accessing The Advanced Dns Tab
Within the domain settings, locate the “Advanced DNS” tab. Clicking this tab will reveal the DNS records associated with your domain. This section is where the magic happens. You have the power to add, edit, or delete DNS records as needed. Have you ever wondered what each DNS record does? Hover over them for brief descriptions that can help you understand their roles. By accessing your Namecheap account and navigating to the appropriate settings, you’re taking control of your online presence. Remember, managing DNS records is not just about technical adjustments; it’s about ensuring your website functions seamlessly. What do you plan to achieve with your DNS changes today?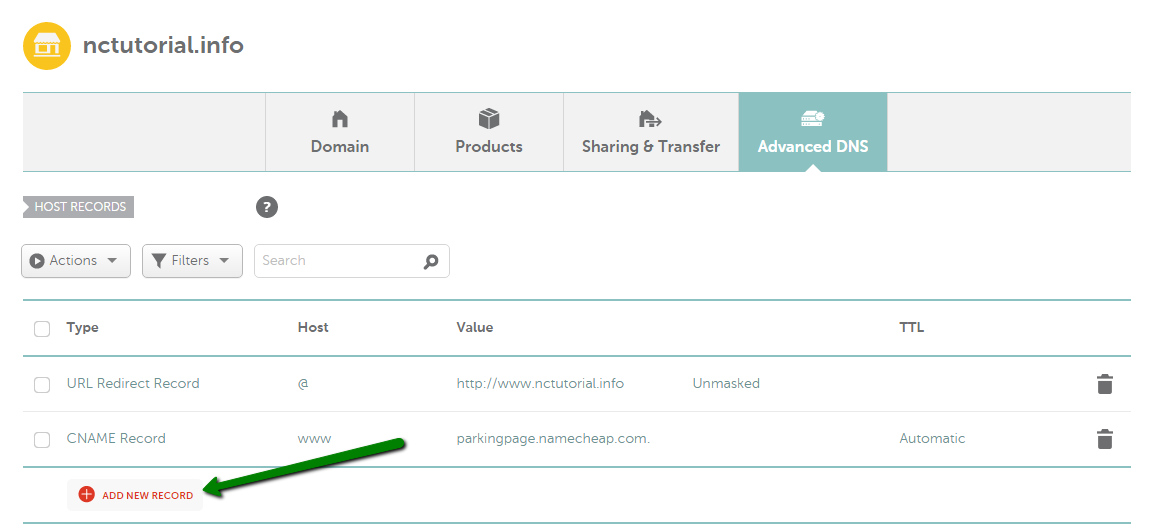
Credit: www.namecheap.com
Locating Dns Settings
Locating DNS settings in Namecheap can be straightforward. These settings are essential for managing your domain effectively. Knowing where to find them saves time. It also helps in troubleshooting any domain-related issues.
By accessing your DNS settings, you can make necessary adjustments. This guide will help you navigate the Namecheap platform with ease.
Start by logging into your Namecheap account. Use your registered email and password. Once logged in, you will see your dashboard. Look for the “Domain List” on the left menu.
Finding Your Domain Name
In the “Domain List,” find the domain you wish to edit. Use the search bar if you have many domains. Click on the “Manage” button next to the selected domain.
Navigating To The Dns Settings
After clicking “Manage,” a new page will open. This page displays all settings related to your domain. Look for the “Advanced DNS” tab. It is usually located at the top or side of the page.
Understanding The Dns Panel
In the “Advanced DNS” tab, you will see various options. These include A records, CNAME records, and more. Each option allows different configurations for your domain.
Editing Dns Records
To edit a DNS record, click on the desired record type. Make the necessary changes in the fields provided. Be sure to save your changes before exiting.
Verifying Changes
After editing, verify that your changes are correct. It may take some time for changes to propagate. Check back after a few hours to ensure everything is working smoothly.
Updating Dns Records
Updating DNS records on Namecheap is essential for managing your domain. DNS records direct internet traffic to the right places. Without correct DNS settings, websites may not load properly. You’ll want to ensure everything is set up right.
Start by logging into your Namecheap account. Use your username and password. Once logged in, navigate to the dashboard. Look for the ‘Domain List’ section. This is where you’ll find all your domains.
Selecting The Domain
In the ‘Domain List’, locate the domain you wish to update. Click on ‘Manage’ next to the domain name. This will open the domain settings page. Here, you can make all necessary changes.
Navigating To The Dns Settings
On the domain settings page, find the ‘Advanced DNS’ tab. Click on this tab to view your current DNS records. You’ll see different types of DNS records listed. Each serves a specific purpose.
Updating The Dns Records
To update a DNS record, find the record you need to change. Click the ‘Edit’ icon next to it. Enter the new information in the appropriate fields. Ensure the details are accurate before saving.
Adding New Dns Records
To add a new record, use the ‘Add New Record’ button. Select the record type, such as A, CNAME, or MX. Input the necessary data in the provided fields. Save the changes once you’ve entered the details.
Verifying Dns Changes
After updating, verify your DNS changes. Use online tools to check if the updates are live. Remember, DNS changes may take time to propagate. It could take up to 48 hours for changes to reflect globally.
Credit: help.mailgun.com
Credit: kinsta.com
Frequently Asked Questions
How To Configure Dns With Namecheap?
Log into your Namecheap account. Go to “Domain List” and select your domain. Click “Manage” and navigate to “Advanced DNS. ” Add or modify DNS records as needed. Save changes to apply the new configuration.
How Do I Change My Dns Records?
Access your domain registrar’s website. Log in to your account. Locate the DNS settings or management section. Edit the records as needed. Save your changes.
How Do I Check My Dns Records On Namecheap?
Log into your Namecheap account. Go to “Domain List” and click “Manage” next to your domain. Select the “Advanced DNS” tab to view your DNS records.
How Long Does Namecheap Take To Update Dns Records?
Namecheap typically updates DNS records within 24 to 48 hours. Changes may propagate faster but can take longer globally. Ensure all settings are correct for quicker updates. Check DNS status regularly for any delays or issues.
Conclusion
Changing DNS records in Namecheap is simple. Just follow the steps. Log in to your account. Go to “Domain List. ” Click “Manage” next to your domain. Select “Advanced DNS. ” Edit the records as needed. Always double-check entries. Save changes.
Your updates might take time to work. Usually, within 48 hours. Be patient. A little practice helps. Soon, you’ll feel confident managing DNS settings. This knowledge empowers your online presence. Keep exploring Namecheap’s features. They’re user-friendly and effective. Happy managing!
