Are you struggling with outdated content or strange glitches on your WordPress site? The culprit might be your cache holding onto old files and slowing down your updates.
Learning how to purge cache in WordPress is a simple yet powerful step that lets you instantly refresh your website’s content and performance. Whether you’re using popular caching plugins or managing your site through WordPress. com, this guide will walk you through easy, clear steps to clear your cache like a pro.
By the end, you’ll have the confidence to fix common display issues and keep your site running smoothly—so keep reading and take control of your WordPress cache today!
Cache Basics
Understanding cache is key for managing your WordPress site well.
Cache stores copies of your website pages to load them faster.
This helps visitors see your site quickly without waiting long.
What Cache Does
Cache saves a version of your webpage on the server or browser.
It reduces the time to load pages by avoiding repeated data fetching.
This means less work for your server and faster browsing for users.
Cache can be stored in many places like plugins, browsers, or CDNs.
Why Purge Cache
Purge cache means deleting stored copies of your pages.
This is important when you update your website content or design.
If cache is not cleared, visitors may see old versions of pages.
Clearing cache makes sure your changes appear immediately to users.
Purge cache often after updates to keep your site fresh and accurate.
Credit: www.ionos.com
Plugin Cache Clearing
WordPress.com uses caching to speed up your website and improve user experience. This cache stores copies of your pages and content. Clearing this cache helps show the latest changes immediately. It is important to know how to purge this cache from your WordPress.com dashboard. The process is simple and quick.
Dashboard Settings
Start by logging into your WordPress.com dashboard. Find the Settings menu on the left side. This area controls many aspects of your website. Within Settings, you will see options related to performance and cache management. Navigating here is the first step to clear your cache.
Performance Section
Inside Settings, look for the Performance section. This section manages how your site handles speed and caching. It shows options to control cache behavior and other speed improvements. Adjustments here affect how content loads for your visitors. This is where you can manage your cache effectively.
Clear All Caches Button
Within the Performance section, find the Clear All Caches button. Clicking this button deletes all cached files stored by WordPress.com. After clicking, wait for a confirmation message. This step ensures your visitors see the newest version of your site. Use this button whenever you update your site content or design.
WordPress.com Cache
Manual cache clearing helps fix display problems and speed up updates on your WordPress site. This process removes stored data that might show old content to visitors. Clearing cache manually gives you control over what and when to refresh. It improves site performance and user experience without waiting for automatic cache expiration.
Browser Cache Removal
Your browser saves website data to load pages faster next time. Sometimes, it holds outdated files that block new changes from showing. Clear your browser cache by opening the settings menu. Find the option to delete “Cached images and files.” This forces the browser to load fresh content from your WordPress site.
Cdn Cache Purge
A Content Delivery Network (CDN) speeds up your site by serving files from servers near visitors. CDN also caches files to reduce load time. Purge CDN cache by logging into your CDN provider’s dashboard. Look for a “Purge Cache” or “Clear Cache” button. This action removes old files and lets the CDN serve the newest version of your site.
Refresh Permalinks
Permalinks are the URLs for your WordPress posts and pages. Sometimes, permalink settings cause caching issues or broken links. Refresh permalinks by going to Settings > Permalinks in your dashboard. Click the “Save Changes” button without changing anything. This process clears permalink-related cache and fixes many common problems.
Credit: docs.themeisle.com
Manual Cache Clearing
Troubleshooting cache issues in WordPress helps keep your site running smoothly. Cache can cause old versions of pages to show. This leads to display errors and outdated content. Fixing these problems quickly improves user experience and SEO. Below are key steps to resolve common cache-related issues on WordPress sites.
Fixing Display Problems
Display problems often occur because the cache stores old page files. Clear your cache plugin to load fresh content. Also, clear your browser cache to see the latest changes. Check your site on different devices to confirm the issue is fixed. If problems persist, try disabling caching temporarily to isolate the cause.
Resolving Plugin Conflicts
Some plugins do not work well with caching tools. This causes errors or broken features on your site. Deactivate plugins one by one to find the conflict. Clear the cache after each deactivation to test changes. Update all plugins to their latest versions to reduce conflicts. Use plugins that are known to be compatible with your cache system.
Updating Outdated Content
Cache may show old posts or pages even after updates. Purge the cache to force your site to load new content. Refresh permalinks in WordPress by saving them again. This helps clear cache linked to URL changes. Use cache settings to exclude certain pages from caching if updates happen often there.
Troubleshooting Cache Issues
Clearing cache is key to keeping your WordPress site fresh and fast. Cached files store old data, which can cause your site to show outdated content. Using smart cache clearing tips helps avoid this problem. These tips ensure visitors always see the latest version of your site.
Proper cache management improves site speed and user experience. Follow these simple tips to clear cache effectively.
When To Purge Cache
Purge your cache after making changes to your website. This includes updates to posts, pages, or design. Also clear cache after installing or updating plugins and themes. Purging ensures your visitors see the new content immediately. Delay in clearing cache can cause confusion and errors.
Regular Maintenance
Set a schedule to clear cache regularly. This prevents buildup of old files that slow down your site. Weekly or bi-weekly clearing is a good practice. Some plugins offer automatic cache clearing options. Use them to save time and keep your site fast.
Using Admin Bar Options
Many caching plugins add clear cache buttons in the WordPress admin bar. This lets you purge cache with one click. Look for options like “Clear Cache” or “Purge All Caches” at the top of your dashboard. It is the fastest way to refresh your site without digging into settings.
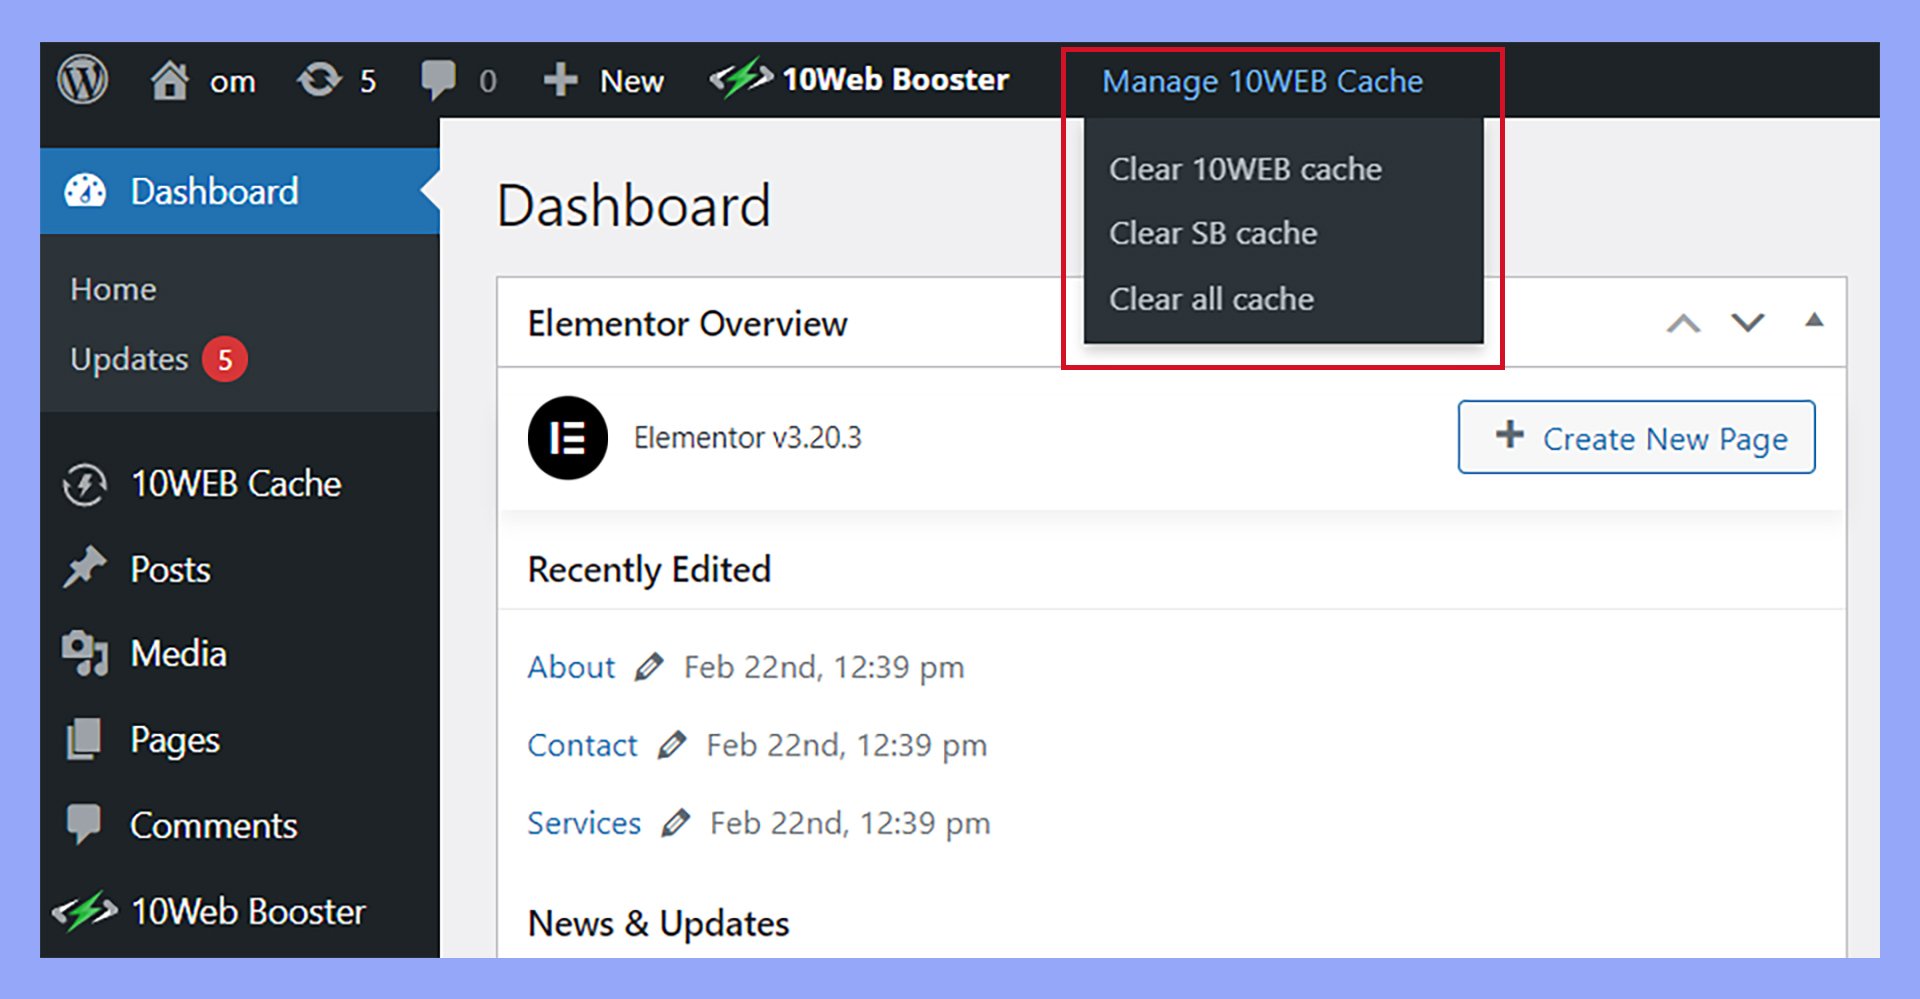
Credit: 10web.io
Frequently Asked Questions
How Do You Purge Cache In WordPress?
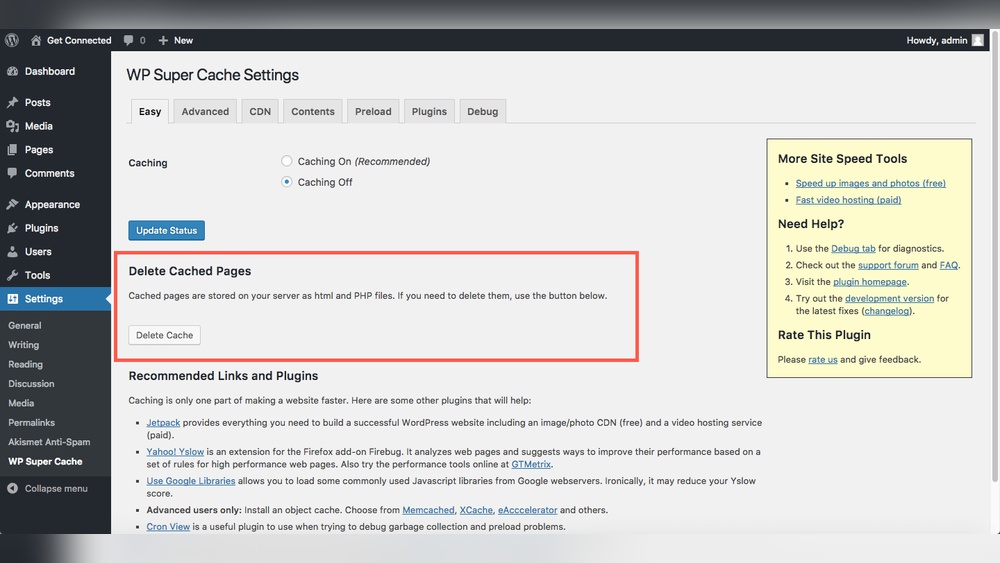
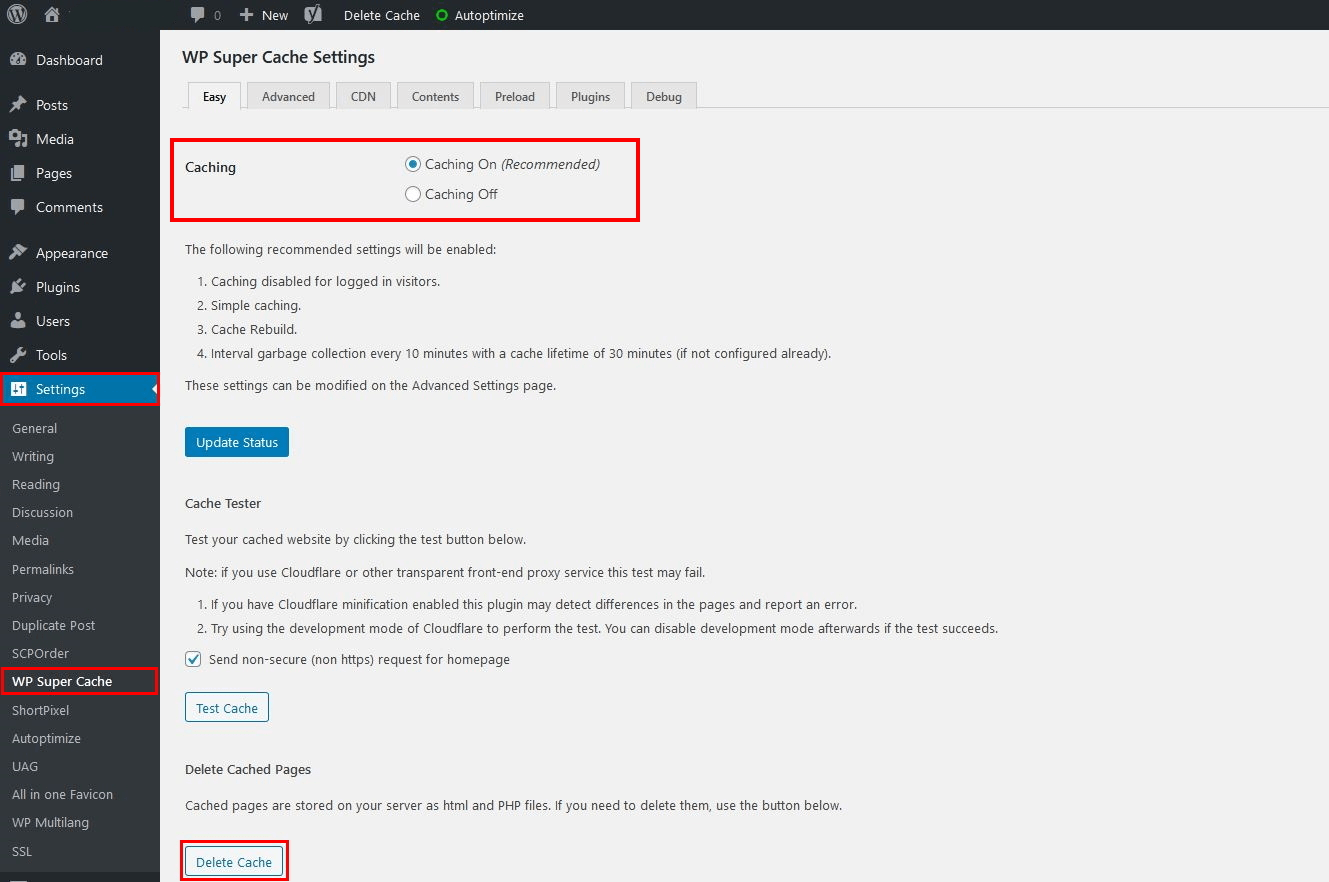
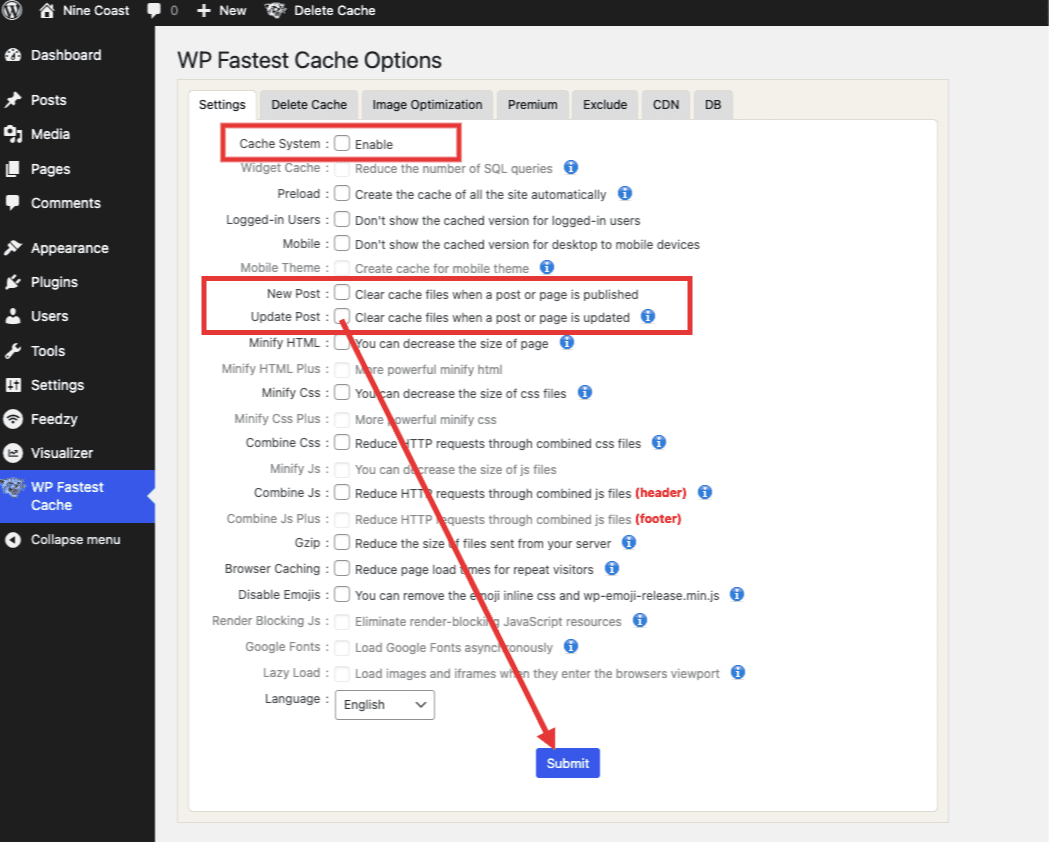
To purge cache in WordPress, go to your admin dashboard. Use your caching plugin’s settings like “Delete Cache” in WP Super Cache or “Clear cache” in WP Rocket. Alternatively, click “Purge All Caches” in performance settings or the admin bar, depending on your setup.
What Happens When You Clear The Cache On WordPress?
Clearing the cache on WordPress removes stored files, forcing the site to load fresh content. This resolves display issues and updates changes immediately.
How Do I Purge The Cache?
To purge cache, access your WordPress admin dashboard. Use your caching plugin’s option like “Delete Cache” or “Clear Cache. ” Alternatively, find “Purge All Caches” in performance settings or top admin bar. For WordPress. com, clear caches under Settings > Performance.
Also, clear your browser and CDN cache if used.
How Do You Purge A Page In WordPress?
To purge a page in WordPress, use your caching plugin’s settings. Click “Delete Cache” or “Clear Cache” in plugins like WP Super Cache or WP Rocket. Alternatively, find “Purge All Caches” in your admin bar or performance settings to clear cached pages instantly.
Conclusion
Clearing cache in WordPress keeps your site fast and updated. Use your caching plugin’s settings to delete old files quickly. Don’t forget to clear browser and CDN cache for best results. Refreshing permalinks can also fix some display issues. Regular cache purging helps visitors see your latest content.
Simple steps make your website run smoothly and improve user experience. Keep these tips handy for easy WordPress cache management.