
Imagine having your very own Minecraft server where you and your friends can build, explore, and conquer worlds together. Sounds exciting, right?
If you’ve ever dreamed of creating a dedicated space for your gaming adventures, you’re in the right place. Setting up a Minecraft server with web hosting might sound daunting, but it’s simpler than you think. This guide will walk you through the process step by step, making it easy for anyone to get started.
You might be wondering, “Why should I create my own server? ” Well, the benefits are plenty. You get full control over game settings, mods, and the community that joins your server. Plus, it’s a fantastic way to enhance your gaming experience and bring your friends along for the ride. Whether you’re a seasoned player or a curious newbie, learning to set up your server opens up a world of possibilities. Don’t worry about technical jargon or complicated procedures. We’re here to simplify everything for you. By the end of this article, you’ll have the confidence and knowledge to create your own Minecraft server using web hosting. Ready to dive in and unleash your creativity? Let’s get started!

Credit: www.youtube.com
Choosing The Right Web Hosting
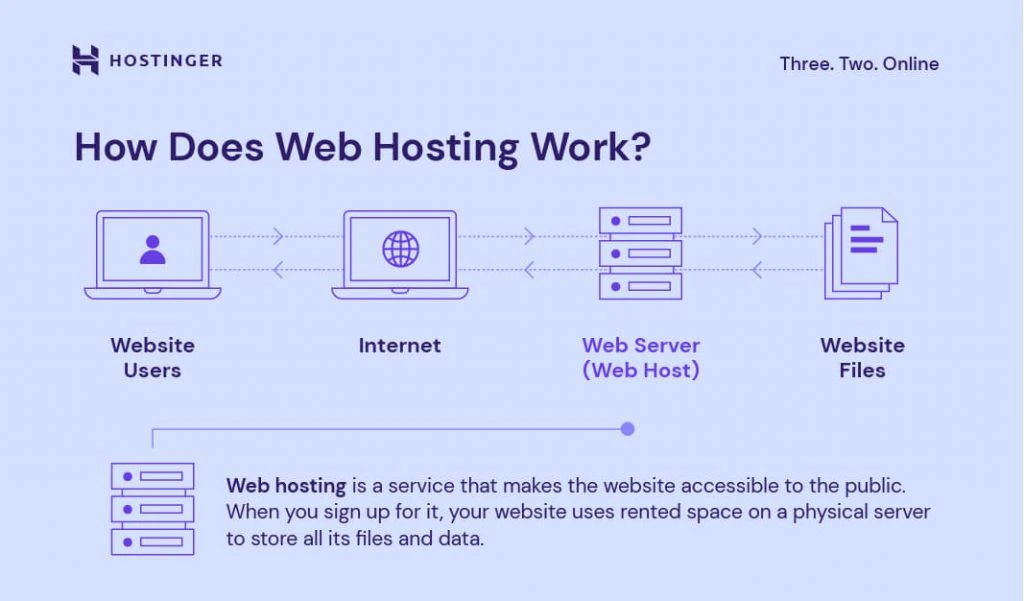
Creating a Minecraft server with web hosting requires choosing a reliable host. Select a provider offering ample storage and good uptime. Ensure they support Minecraft server requirements for smooth gameplay.
Factors To Consider
Web hosting is important for your Minecraft server. Server speed is key for smooth gameplay. Storage space matters if you have many players. Customer support helps solve problems quickly. Pricing is important for your budget. Security features keep your server safe. Uptime guarantee ensures your server is always online. Check these before choosing.
Popular Hosting Providers
| Provider | Features |
|---|---|
| Hostinger | Low cost, good speed |
| Bluehost | Strong security, reliable |
| A2 Hosting | Fast servers, good support |
| SiteGround | Good uptime, helpful support |
Setting Up The Server Environment
Java is needed for the server. First, check if Java is installed. Type java -version in the command prompt. If not installed, download it from the official website. Follow instructions to install Java. It’s free and simple.
Visit the Minecraft website to download server files. Click on the download link. Save the file to a new folder. This folder will be your server folder. You can name it Minecraft Server. Keep this folder organized. Make sure you remember where it is.
Configuring Server Settings
Server properties are like rules for your game. Open the server.properties file. This file is in your Minecraft server folder. Use a text editor to open it. You can change settings here. Change game mode to survival or creative. Adjust difficulty level for more fun. Set maximum number of players. Make sure it’s not too crowded. Choose your world type. Flat or normal. Change the game time. Day or night. Save the file after changes.
Game rules make your world special. Use commands to change them. Turn on or off mob spawning. Decide if monsters appear. Change fire spread rules. Keep forests safe. Adjust weather settings. Rain or shine. Control player damage. Make players safe or risky. Use command blocks to set rules. These blocks help you change game rules fast. Always test your changes. Make sure the game is fun for everyone.
Port Forwarding And Network Setup
Begin by accessing your router’s settings. Use a web browser for this task. Type the router’s IP address in the address bar. Login using the username and password. Look for the port forwarding section. Enter the Minecraft server port number. This is usually 25565. Save these changes. Your router settings are now configured.
Security is important for your server. Use a strong password for your router. This keeps your network safe. Update your router’s firmware regularly. Check for updates on the manufacturer’s website. Also, enable firewall settings. This protects against unwanted access. Always keep your network secure.
Managing Server Performance
Creating a Minecraft server with web hosting involves setting up, configuring, and monitoring server performance. Choose reliable hosting providers to ensure smooth gameplay. Regularly optimize settings and resources for an enjoyable gaming experience.
Allocating Ram And Resources
Assign enough RAM to keep the server running smoothly. More RAM can mean a better gaming experience. Check your web host’s options for resource allocation. Make sure your server has the necessary power. This helps players enjoy their game without lag. Use control panels to adjust these settings. It’s easy to change them if needed.
Monitoring Server Load
Keep an eye on server load to avoid slowdowns. Use tools to track performance. Regular checks help spot issues early. Fix problems before they affect gameplay. Watch for high CPU usage. This can slow down the server. Keep your server healthy for happy players. Monitor regularly for best results.

Credit: www.pcmag.com
Installing Plugins And Mods
Plugins and mods make your Minecraft server more fun. But it’s important to get them from reliable sources. This keeps your server safe from harm. Trusted websites include CurseForge and SpigotMC. Always read reviews before downloading. This helps avoid bad plugins. Check for updates often. This keeps everything running smoothly. Avoid unknown sites. They might have harmful files.
Adding And Configuring Plugins
Once you find the right plugin, download it. Make sure it matches your server version. Next, place the plugin file in the server’s plugin folder. Restart the server to activate it. Many plugins need extra setup. Check the plugin’s documentation for guidance. This helps with correct settings. Adjust settings in the config files. This customizes the plugin for your server. Remember to save changes and restart the server. This applies new settings.
Ensuring Server Security
Regular backups keep your Minecraft server data safe. Backups protect against data loss. Server crashes can happen anytime. Make sure to backup files often. Use a reliable backup service. Always store backups in a secure place. Cloud storage is a good option. Create a backup schedule. Stick to it regularly. Keep multiple backup copies. This ensures data safety.
Protect your server from unauthorized access. Use strong passwords. A mix of letters, numbers, and symbols works best. Change passwords regularly. Share passwords with trusted people only. Set up a whitelist. This allows only approved players. Keep server software updated. Updates fix security bugs. Always monitor server activity. Look for suspicious actions. Use a firewall for extra security.
Credit: www.hostinger.com
Troubleshooting Common Issues
Setting up a Minecraft server with web hosting can be tricky. Common issues include network errors and server crashes. Solutions often involve checking server settings and ensuring proper firewall configurations.
Resolving Connection Problems
Connection problems can be annoying. Check your internet connection first. Make sure your server is online. Restart the server to fix minor issues. Firewall settings might block connections. Ensure they allow Minecraft. Port forwarding is essential. Check if ports are open. Use a tool to test this. Server address should be correct. Verify it with players. Update Minecraft version if outdated. Everyone should use the same version. Test with a different network to rule out local issues.
Addressing Performance Lag
Lag can spoil the fun. Start by checking server resources. RAM and CPU should not be maxed out. Reduce the number of players if lag continues. Lower render distance to ease the load. Install performance mods like Optifine. They can help a lot. Close background apps on your computer. They may use needed resources. Update plugins and server software. New versions fix bugs. Ensure server location is close to players. This can reduce lag.
Frequently Asked Questions
How To Make A Minecraft Server Hosting Website?
Create a Minecraft server hosting website by choosing a domain, setting up a server, and designing user-friendly pages. Ensure secure payments and customer support. Use SEO techniques for visibility, and regularly update content to stay relevant.
How Much Ram For A 1000 Player Minecraft Server?
For a 1000 player Minecraft server, allocate at least 32GB of RAM. Ensure the server runs smoothly by optimizing plugins and settings. High player counts require robust hardware and efficient management to maintain performance. Consider dedicated server hosting for optimal results.
Can I Host My Own Minecraft Server For Free?
Yes, you can host a Minecraft server for free using platforms like Minehut or Aternos. These services offer free server hosting with basic features. Keep in mind, performance may vary depending on server load and limitations. For better control and reliability, consider paid options.
Is There A 24 7 Free Hosting For Minecraft?
Yes, some platforms offer free Minecraft server hosting 24/7. Options include Aternos, Minehut, and Server. pro. These services provide basic features but may have limitations like player caps or server performance. Always review terms to ensure they meet your needs.
Conclusion
Setting up a Minecraft server with web hosting is simple. Follow the steps, and you’ll have your server running smoothly. Remember to choose reliable hosting. It ensures a better gaming experience. Customize your server settings to fit your needs. Invite friends and enjoy your virtual world together.
Troubleshooting tips can help solve common issues. Keep learning and exploring new features. With patience, your server will thrive. Enjoy the fun and creativity Minecraft offers. Happy building!


