Are you ready to unlock the full potential of your web applications? Hosting your Web API in IIS Manager can elevate your project, making it more accessible and robust.
Imagine the power of having your API seamlessly integrated into a server environment that is trusted and widely used by professionals around the globe. No more hassles of compatibility issues or deployment troubles. By hosting your Web API in IIS, you gain control, security, and efficiency.
This process might seem daunting, but with the right guidance, you can navigate it with ease. We’re going to walk you through each step, ensuring you have the tools and knowledge needed to succeed. Whether you’re a seasoned developer or just starting out, understanding how to host your API can be a game-changer. Stick with us, and transform your web application experience today!
Credit: www.c-sharpcorner.com
Preparing The Environment
First, go to the Control Panel on your computer. Find the option for Programs and click it. Then, look for Turn Windows features on or off. In the list, find Internet Information Services. Check the box next to it. Click OK to start the installation. Your computer may need to restart. Once done, IIS Manager is ready on your computer.
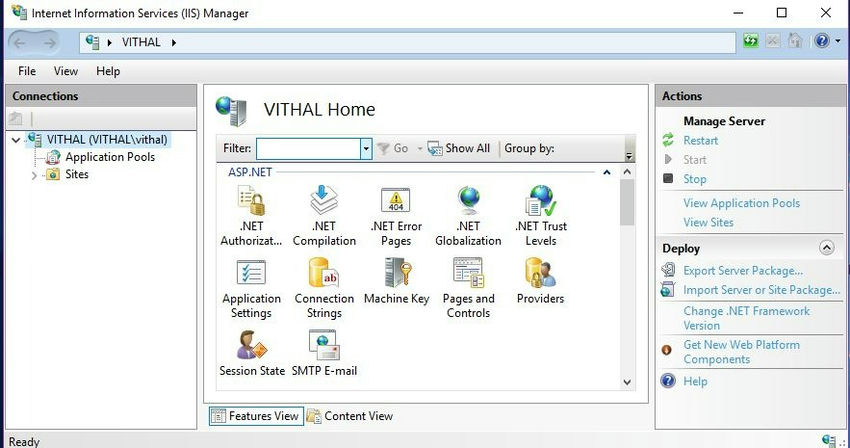
Open the IIS Manager from the start menu. Look for your computer’s name on the left. Click on it to see the list of features. Find and double-click Application Development. Make sure to enable ASP.NET and ISAPI Extensions. These are essential for hosting web APIs. Confirm changes and close the window. Now your system is ready to host a web API.
Configuring Iis For Web Api
To create a new site, open the IIS Manager. Click on Sites in the left panel. Choose Add Website from the right menu. A window appears. Enter a name for your site. Choose a folder path for your site files. Set the binding options. Include your site’s hostname. Click OK to save your settings.
In IIS Manager, find Application Pools in the left panel. Click on it. Choose Add Application Pool from the right menu. Name your pool. Select .NET CLR version. Choose Integrated for the pipeline mode. Click OK to create the pool. Assign your site to this pool. This ensures your app runs smoothly.
Deploying Web Api
First, open your project in Visual Studio. Click on Build and then select Publish. Choose a folder to save your published files. This creates a deployment package. Make sure all files are in this package. This step is crucial for deployment.
Use an FTP client to upload files. Connect to your server using FTP credentials. Drag and drop your files to the server folder. Ensure all files are uploaded correctly. Double-check the file paths. Incorrect paths cause errors.
Binding Domain And Port
To bind a domain, open IIS Manager. Select your site. Click on the bindings option. A new window appears. Click “Add”. Choose the type of binding. Usually, it’s HTTP. Enter your domain name. Leave the IP address field blank. It will work for all IPs. Click “OK” to save.
Ports help find services on a server. To assign a port, go to bindings. Choose your site. Click “Add”. In the port field, enter a number. Common ports are 80 for HTTP and 443 for HTTPS. Avoid using ports below 1024. These are reserved. Click “OK” to finish.
Testing The Deployment
Accessing the API is simple and requires a few steps. Open a browser. Type the API URL in the address bar. Hit enter to access the API. Ensure the URL is correct. If the API works, you will see data or messages. If it does not work, check the URL and try again. Make sure the server is running.
Troubleshooting Common Issues may arise during deployment. Check if the server is running. Ensure the network connection is stable. Verify the API URL. Check firewall settings. Sometimes, the port might be blocked. Ensure the port is open. Review server logs for errors. Logs help find issues quickly. Restart the server if needed. Restarting can solve many problems.
Security Considerations
Securing your Web API in IIS Manager involves setting permissions and using HTTPS. Implementing strong authentication ensures only authorized users access the API. Regularly update software to protect against vulnerabilities.
Implementing Https
Using HTTPS keeps your data safe. It stops others from seeing it. You need a SSL certificate for HTTPS. This certificate makes sure your site is secure. Without it, your data can be at risk. So, always use HTTPS for better security.
Setting Permissions
Permissions control who can access your Web API. It is important to set them correctly. Use specific permissions for users. This limits who can change settings. Allow only trusted users to have full access. This keeps your Web API safe from threats.
Monitoring And Maintenance
Logging helps track your web API’s activity. It records events and errors. This way, you can see what happens. Use tools like Log4Net or Serilog. These tools are easy to set up. They store logs in files or databases. Logs help find and fix issues faster.
Analytics show how users use your API. Tools like Google Analytics can be used. They provide insights into usage patterns. This helps improve your API. Make sure to check these insights regularly. They guide you on what works and what doesn’t.
Regular updates keep your API secure. They also improve performance. Always update libraries and frameworks. Security patches fix vulnerabilities. They protect your data and users. Regular updates ensure your API runs smoothly.

Credit: learn.microsoft.com

Credit: learn.microsoft.com
Frequently Asked Questions
Can Web Api Be Hosted In Iis?
Yes, a Web API can be hosted in IIS. It supports. NET applications, ensuring scalability and security. Deploying involves creating an application pool and site in IIS. Ensure the correct. NET version is selected. Properly configure bindings, authentication, and authorization settings for optimal performance.
How Do I Host My Web Api?
Host your Web API on cloud platforms like AWS or Azure. Set up a server, install dependencies, and deploy. Use Docker for containerization. Ensure security with HTTPS and API keys. Regularly monitor and scale based on traffic.
How To Host A Web Service On Iis?
Install IIS via Windows Features. Open IIS Manager. Add a new website. Configure site bindings. Deploy files. Start the service.
How To Host .net Core Web Api As Windows Service?
Create a. NET Core Worker Service project. Implement your Web API logic in it. Use `sc create` command to register the executable as a Windows Service. Ensure proper configuration in `appsettings. json`. Deploy and start the service using Windows Service Manager.
Monitor and manage through Event Viewer for logs.
Conclusion
Hosting your Web API in IIS Manager can seem complex. But it’s doable. Follow each step carefully. Ensure your server is configured correctly. Check for any errors during setup. Troubleshoot common issues promptly. Keep security measures in place. Regular updates help maintain performance.
Proper hosting enhances your API’s reliability. This benefits your users significantly. Practice makes perfect. The more you host, the easier it gets. Use this guide as a reference. With patience, you’ll host like a pro. Good luck on your hosting journey!