Are you ready to take your ASP.NET web application to the next level by hosting it on IIS? Whether you’re a seasoned developer or just starting out, the process can seem daunting.
But don’t worry—this guide is here to simplify the steps for you. Imagine the satisfaction of seeing your application running smoothly and efficiently, accessible to users around the globe. By following this article, you’ll gain the confidence and skills needed to master IIS hosting.
You’ll discover tips and tricks that will make the process not only manageable but also enjoyable. So, why wait? Dive into the details and unlock the potential of your ASP. NET application with IIS hosting.
Credit: www.freecodespot.com
Prerequisites For Hosting Asp.net
A computer with Windows operating system is needed. Ensure it has enough RAM and storage. A 64-bit processor is recommended. Regular updates should be installed. This helps to keep your system secure. Check for the latest updates before starting.
IIS (Internet Information Services) is important for hosting. It can be added through Windows Features. ASP.NET Core should also be installed. This is required to run your application. Make sure to install the .NET Core Hosting Bundle. It is crucial for server operations. Confirm the installation by running a simple test. This ensures everything is set up correctly.
Preparing Your Web Application
The Web.config file is very important. It holds settings for your app. Open this file. Look for connection strings. Ensure they are correct. Check the authentication settings. Set it to your needs. Look at the custom errors. Set them to “On” for production. This shows friendly error pages.
Review the session state. Choose the right mode. It could be InProc or SQLServer. Save your changes after editing. These settings will help your app run smoothly.
You need to build your application. Open Visual Studio. Load your project. Click on “Build” in the menu. Then select “Build Solution.” This compiles your code. It will create necessary files. Check for errors during the build. Fix any issues you find. After the build is successful, your app is ready for the next step.
Setting Up Iis
Hosting an ASP. NET web application in IIS involves installing IIS, configuring site settings, and deploying your application files. Ensure your server meets ASP. NET prerequisites. Follow security best practices to protect your application and optimize performance for a seamless user experience.
Installing Iis
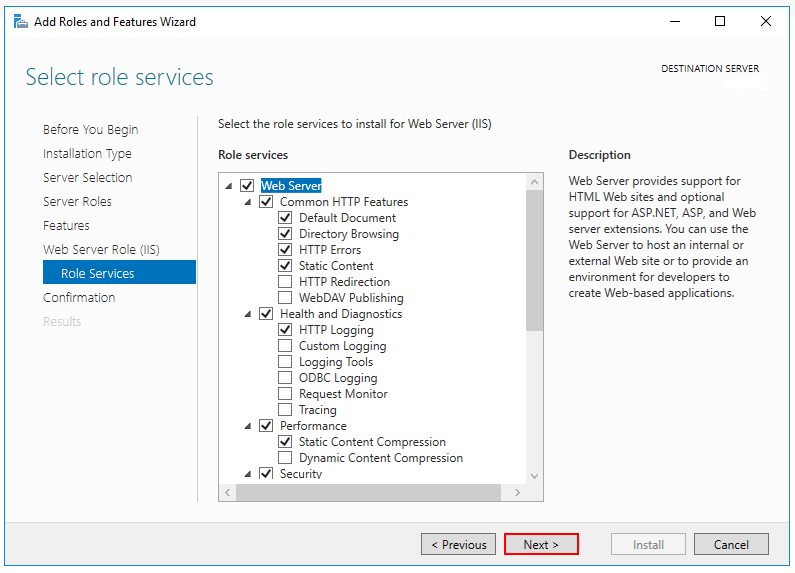
Begin by opening the Control Panel. Then, go to Programs and click on Turn Windows features on or off. A window will appear. Here, check the box next to Internet Information Services (IIS). Click OK to install. Wait for the installation to complete. Finally, restart your computer to apply changes.
Enabling Required Features
Open the Control Panel again. Navigate to Programs and then Turn Windows features on or off. Expand the Internet Information Services section. Check the boxes for ASP.NET and World Wide Web Services. Ensure Application Development Features are selected. Click OK to save your settings. Restart your computer once more.
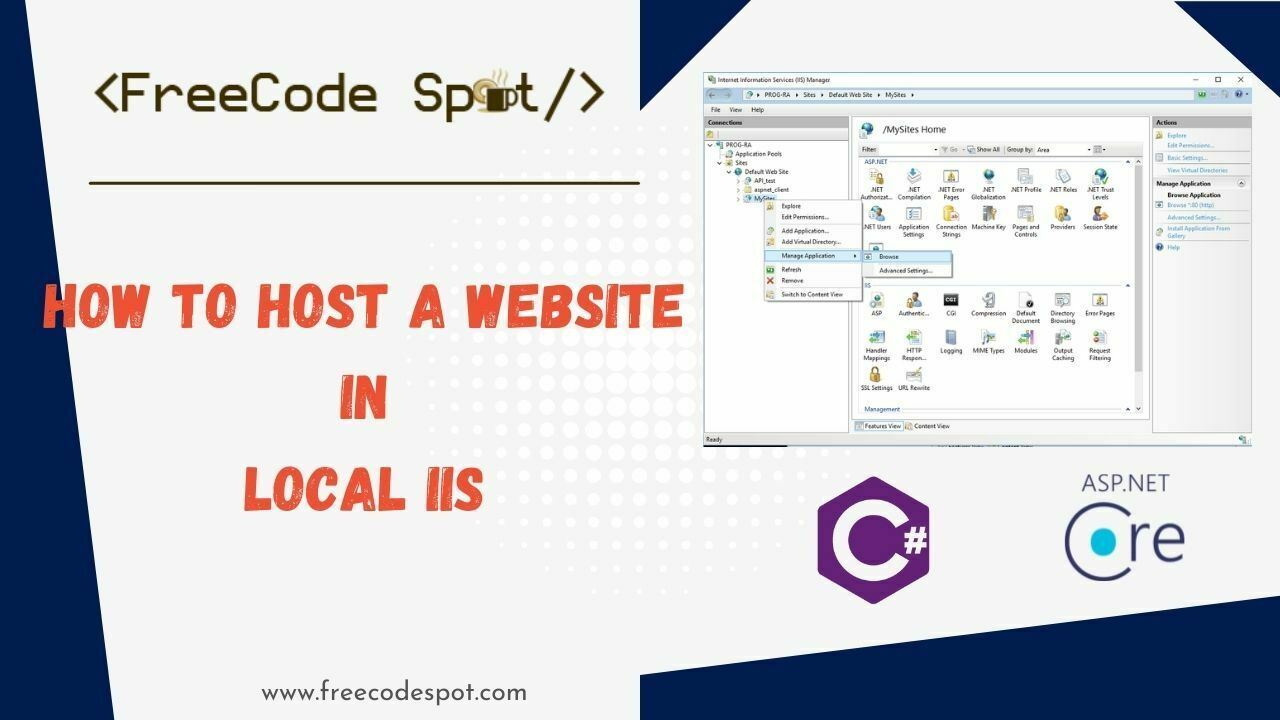
Deploying Asp.net Application
Open the IIS Manager on your computer. Find the Sites folder. Right-click on it and choose Add Website. Enter the site name you want. Choose the physical path of your ASP.NET files. Set the IP address and port number. Click OK to create the website. Your website is now added in IIS.
Go to Application Pools in the IIS Manager. Right-click and select Add Application Pool. Name your new pool. Choose the .NET Framework version. Click OK to create the pool. Now, go to your website in IIS. Right-click and choose Manage Website. Select Advanced Settings. Under Application Pool, select your new pool. Click OK to save settings. Your application pool is now configured.
Testing The Deployment
Deploying an ASP. NET web application in IIS involves testing its functionality. Ensure the application runs smoothly by checking server configurations, application settings, and security measures. Troubleshooting common issues can prevent downtime and enhance user experience.
Accessing The Application
Open a web browser. Enter the URL of your ASP.NET web application. Press Enter to navigate. The application should appear on the screen. Verify all pages and links work properly. Check if images load correctly. Ensure interactive elements respond. Confirm that forms submit data successfully. Use different browsers to test compatibility. Check mobile responsiveness. Make sure everything functions as expected.
Troubleshooting Common Issues
Sometimes, errors happen. Check if the application pool is running. Review IIS settings. Verify file permissions. Ensure the connection string is correct. Look at error messages carefully. Use logs to find clues. Restart IIS if needed. Double-check network configurations. Make sure firewall rules allow access. Confirm database connections are stable. Seek help if problems persist.
Security And Optimization
Setting up security is very important. Use strong passwords for IIS. Enable SSL to protect data. Make sure to use firewall rules. They block unwanted traffic. Keep your server software updated. Updates fix security holes. Always back up your data. Backups save your data in case of attack.
Performance matters for web applications. Enable caching to load pages faster. Use compression to make files smaller. Smaller files load quicker. Keep your application code clean. Clean code runs faster. Limit the number of requests to the server. Fewer requests mean less load. Monitor your server’s performance regularly. Regular checks help in finding issues early. Adjust settings to improve speed.
Maintaining The Web Application
Servers work hard. They need care. Regular checks are essential. Performance monitoring helps spot issues early. Use tools to watch memory and CPU. Look for spikes. Too much load slows things down. Analyze logs. Logs show errors and warnings. Fix them quickly. Healthy servers mean happy users.
Software gets old. Bugs appear. Updates fix bugs. They add features. Patching is vital for security. Hackers seek weak spots. Always apply patches. Schedule updates regularly. Inform users about downtime. Keep backups. Backups save data if things go wrong. Test updates first. Testing prevents big problems.

Credit: www.binaryintellect.net
Credit: learn.microsoft.com
Frequently Asked Questions
How To Host An Asp.net Application In Iis?
To host an ASP. NET application in IIS, install IIS, deploy your application files, and configure the site in IIS Manager. Bind the domain and set application pool settings. Ensure ASP. NET features are enabled, then start the site. Test the application to confirm successful deployment.
How Do I Run Asp In Iis?
Enable ASP in IIS by opening IIS Manager. Navigate to ‘Features View’, click on ‘ASP’, and configure settings. Ensure ‘ASP’ is installed via ‘Turn Windows features on or off’. Restart IIS for changes to take effect.
How To Deploy .net Framework Application On Iis?
To deploy a. NET Framework application on IIS, install IIS on your server. Configure application pools, then publish your app. Copy files to the server, set permissions, and configure bindings. Test the deployment by accessing the application URL in a browser.
How Do I Host My Website In An Iis Server?
Install IIS through Windows Features. Open IIS Manager, create a new site, and specify the site’s path. Bind the site to a domain or IP. Set permissions for the site’s folder. Start the website within IIS Manager to host it.
Conclusion
Hosting your ASP. NET web application in IIS is straightforward. Start by ensuring your server is ready. Install the necessary components, then deploy your application. Configure IIS settings for optimal performance. Test your application thoroughly. Check for any errors and fix them promptly.
This process helps maintain a stable environment for users. Stay updated with the latest IIS features. Regular maintenance is key for smooth operations. By following these steps, your web application can run efficiently on IIS. Keep learning to improve your hosting skills.
Happy hosting!