Are you struggling to upload images to your WordPress theme? You’re not alone.
Many WordPress users find this task challenging, especially when they want their site to look just right. But don’t worry; you’re about to discover how to do it effortlessly. Imagine how it will feel to finally have the perfect images on your site, capturing your visitors’ attention and setting the tone you’ve always wanted.
This guide will walk you through each step, making the process simple and stress-free. By the end of this article, you’ll have the skills to enhance your website’s visual appeal, ensuring your visitors stay engaged. So, are you ready to transform your site’s look with stunning images? Let’s dive in!
Credit: www.crazyegg.com
Setting Up Your WordPress Dashboard
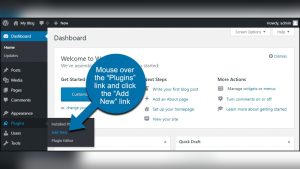
First, open your browser. Type the website’s URL. Add /wp-admin at the end. Press enter. You will see the login page. Enter your username and password. Click the login button. Now, you are in the admin panel. It’s like a control room for your site.
Look at the left side menu. Find the word Media. Click on it. This opens the Media Library. You can see all your images here. To upload, click Add New. Choose a file from your computer. Wait as it uploads. Now, the image is ready to use.

Credit: www.youtube.com
Preparing Your Image For Upload
Pick the best format for your image. JPEG is great for photos. PNG works well for graphics. GIF is best for simple animations. Each format has its own strengths. JPEGs are smaller and load faster. PNGs keep quality high. Choose wisely for a better website.
Keep your image size small. Large images slow down a site. Aim for under 100KB if possible. Use tools to compress images. This helps them load quickly. Smaller images use less data. Visitors will enjoy a faster website. Make sure your images look clear. Balance size and quality for the best result.
Uploading An Image
First, go to your WordPress dashboard. Click on Media in the menu. Then choose Add New. A new page will open. Here, click on Select Files. Find your image on your computer. Click it and hit Open. Your image will upload to the library. Now, you can use it in posts or pages.
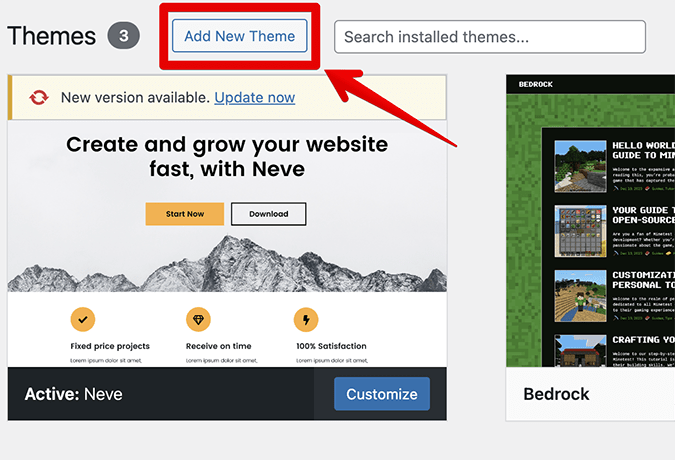
Start by opening the Customizer. Find it under Appearance in the dashboard. Once there, look for Header or Background options. Click on Add Image or Change Image. A window will pop up. Choose an image from your media library or upload a new one. Hit Save to finish.
Inserting Image Into Posts Or Pages
The block editor is simple. Click the plus sign to add a block. Choose the image block. Click upload. Select your image. Wait for it to upload. The image appears in your post. You can drag and resize. Add captions below. Save the changes.
The classic editor is different. Find the media button above the text box. Click on it. Select upload files. Choose your image from your computer. Click upload. The image inserts in your text area. You can adjust size and alignment. Save your work.
Setting A Featured Image
Featured images are special pictures for your blog posts. They make your page look nice. This image shows on the top of your post. It is also seen in previews. Always pick an image that fits your content. This helps readers know what your post is about. Featured images can be added easily in WordPress. You just need to know where to click.
Start by going to your post editor. Look on the right side. Find the “Featured Image” box. Click “Set Featured Image.” Choose your picture. Upload it from your computer. Or, pick from the media library. Click “Set Featured Image” again. Your image is now set. It will show at the top of your post. Make sure it is clear and related to your text.
Customizing Image Appearance
Choose the image you wish to align. Use the alignment options to position it. You can place it on the left, center, or right. This makes your page look neat. It’s easy and quick to do. Just click and see the changes. Your image will now fit better with the text.
Captions explain what an image shows. They can be funny or serious. Adding alt text helps people understand the image if it doesn’t load. It also helps search engines. Describe the image in simple words. This makes your site friendly to all users. Now, your images have more meaning and purpose.
Troubleshooting Common Issues
Uploading an image to a WordPress theme often encounters issues. Common problems include incorrect file formats or size limitations. Ensure images are in supported formats like JPEG or PNG, and check file size restrictions.
Resolving Upload Errors
Sometimes images don’t upload due to their size. Reduce the size of the image. Use tools like TinyPNG or JPEGmini. This makes images smaller without losing quality. Check your internet connection too. A slow connection can stop uploads. Change the image format if needed. Try using JPEG or PNG. If errors persist, reset your browser. Clear cache and cookies. This often fixes upload issues.
Handling Image Display Problems
Images might not show correctly. Clear your browser cache first. This can solve many display issues. Ensure your theme supports the image format. Some themes only support JPEG or PNG. Check the file name for special characters. Remove any if present. They can cause display errors. Update your WordPress and theme. An outdated system often causes problems. These steps usually fix display issues. If not, seek further help.
Credit: www.wordfence.com
Frequently Asked Questions
How To Upload Images To WordPress Themes?
To upload images, navigate to your WordPress dashboard. Go to ‘Appearance’, then ‘Customize’. Select ‘Header’ or ‘Background’ to upload images. Use the ‘Media Library’ for inserting images. Ensure images are optimized for fast loading. Check theme documentation for specific instructions.
Can I Upload Multiple Images At Once?
Yes, you can upload multiple images simultaneously using the WordPress Media Library. Click on ‘Add New’ and select multiple files. Use the ‘Ctrl’ or ‘Command’ key to select several images. This method saves time and streamlines the upload process.
What Is The Best Image Format For WordPress?
The best image formats for WordPress are JPEG, PNG, and GIF. JPEG is ideal for photos due to its compression capabilities. PNG is better for logos and images with transparency. GIF is used for simple animations. Choose the format based on your image needs.
How Do I Optimize Images For WordPress?
To optimize images, use a plugin like Smush or ShortPixel. Compress images before uploading to reduce file size. Ensure images are responsive and use alt text for SEO. Proper optimization improves site speed and user experience.
Conclusion
Uploading images to your WordPress theme is straightforward. Start by accessing your dashboard. Navigate to the media library. Click ‘Add New’ to upload your image. Make sure your image is optimized. It’s important for site speed. Use relevant alt text for better SEO.
Choose the right format for your theme. JPG or PNG work well. Resize images if needed. Check your theme settings. Ensure images display correctly. Preview your changes on the site. Confirm they enhance your design. With practice, it becomes easy.
Enhance your WordPress site visually with these steps.